
Autumn is ahead and every mother whose child is already attending Kindergarten, we have to do hand-made crafts with him on the current topic "Gifts of Autumn" from materials kindly provided to us by Mother Nature.
Natural materials that come in handy:
- chestnuts;
- cones;
- autumn leaves;
- dried flowers;
- dry ears;
- rowan berries;
- orange lentils;
- small pumpkin;
- hazelnuts and walnuts;
- acorns;
- pumpkin, sunflower, watermelon seeds;
- tree bark;
- bird feathers;
- physalis;
- cinnamon sticks;
- dried citrus slices;
- etc.
We have made for moms a selection of elementary fantasy crafts for kindergarten using autumn materials and on the theme of autumn, which you can do with your child.
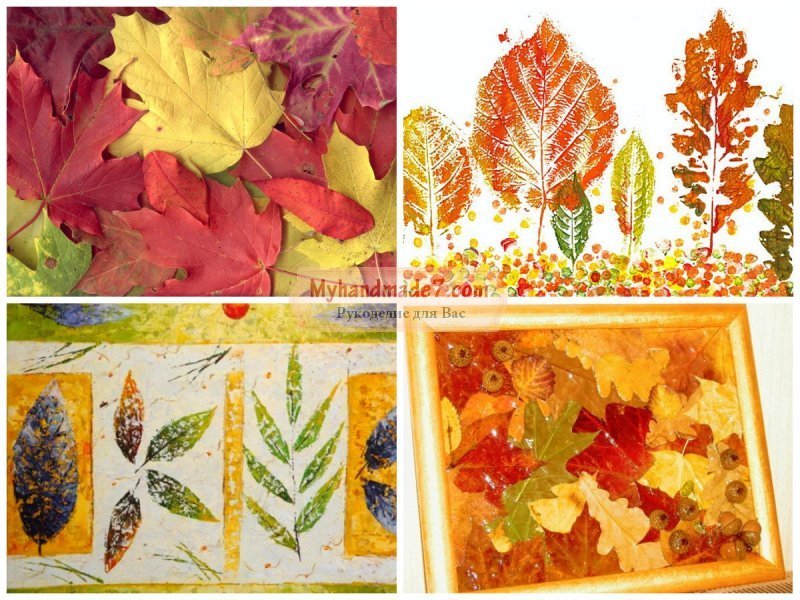
1. Figures from autumn leaves on paper
The child will be surprised by the variety of options for what can be made from autumn leaves. Do not limit your imagination, choose the most interesting shapes from the leaves of trees of different species.
You will only need PVA glue (or glue stick), colored pencils and many small leaves and sticks collected in the nearest park. 


2. Autumn wind music
To create a decoration in the style of "wind music" you need stick suitable size bright leaves beautiful shape, rope or yarn.
Leaves can also be made from colored cardboard, felt or clay.
Additional decor can be cones, acorns, physalis lanterns, dried citrus circles, decorative clothespins, cinnamon sticks, large wooden beads, themed figures cut out of felt.


3. Add new colors to natural materials
To diversify our material for creativity, you can use paints.
Suitable for cones gouache, and in order to color the leg of the acorn, it is best to use acrylic or tempera paints.
With the help of a brush, we apply paint in a dense layer and get a completely new interesting result.
Girls will also enjoy using sequins- apply evenly with a brush glue on the selected place and sprinkle with sparkles on top.
Your crafts made from natural materials will literally sparkle with new colors!


Autumn leaves are also painted acrylic paints or gouache, depending on how porous the surface is.
If gouache is porous enough, only acrylic paints or nail polish.


Painted leaves can be glued with glue gun on the panel, and multi-colored cones beautifully put in glass jar
, tied with a satin ribbon or made from them garland.
4. Autumn wreath from a disposable plate
The basic element of the craft here is plastic or paper disposable plate with a cut-out bottom, on which, with the help of glue gun or other suitable glue in a tube, multi-colored autumn leaves.
It is better to take real leaves, but as an option, felt or fabric ones are also suitable. In this case felt should be multi-colored so that you can beautifully alternate the leaves.
At the end is attached to the wreath eyelet for which it can be hung.


5. Flowers from corn
Popular in autumn corn on the cob can be used for more than just food.
Due to the rich yellow color, corn is a great material for creativity with children.
To make beautiful corn flowers must be cut fresh cob in circles, stick into each toothpick as a stem, the other end of which is drowned in half raw potatoes for the stability of the composition. Place the entire composition in beautiful pot, can be used sour cream or yogurt container, pre-decorating it to your taste.

6. Chestnut crafts
A chestnut growing in the yard can also inspire creativity with a child.
In combination with plasticine, colored paper and self-adhesive toy eyes, which can be purchased at art stores, you can create very funny figures that you can think of. 

7. Crafts from cones
crafts from cones by popularity, they usually rank first in the list of autumn crafts.
They can also be successfully combined with plasticine to get a variety of animals: mice, squirrels, dogs, hedgehogs, etc. And here again come in handy toy eyes.
And if you find in stores for creativity chenille wire and major wood beads to make a head, you can even compose your own interesting characters.


8. Autumn tree
No less popular autumn theme for crafts are autumn trees.
If you collect more on the street branches and put them in glass container, filled with something to hold the branches in the right position, then you can get a bush quite suitable for further fantasies.
Suitable for attaching leaves to branches glue gun.


9. Autumn cards
If your child does not yet know that you can get a beautiful print by applying a colored autumn leaf to white or craft sheet of paper, then it's time to show him this "trick".
 10. Autumn candlesticks
During the cold season, candles appear in many homes as a cozy home decor.
Any child will be happy to help make a themed autumn candlestick that will decorate your home.
As a base, you need to find ready-made clear glass candle holders or small glass cups.
Useful from natural materials leaves, ears of corn, cones, branches, as well as twine or satin ribbon for decoration.


Girls, let's lay out who did what for the autumn holiday in kindergarten! Maybe last year, if anyone has a photo.  Today in kindergarten I saw such a craft - maple leaf roses. Photo for example. Googled it. I share with you. Basically, it's easy. I suggest you try!
In order to make a rose from autumn leaves, we will collect maple leaves in the garden, in the forest or in the park. In order to make a rose from autumn leaves, maple leaves that are too small, dry, diseased and torn are not suitable. It is best to pick up autumn maple leaves in different colors if you plan to make a bouquet. For each individual flower, it is better to choose leaves of the same color. 
We fold the first sheet in half across the central vein so that the front side is outside, as shown in figure number two. After that, you need to roll the folded maple leaf into a tight roll. This roll will be the core of the future rose. The process of rolling a maple leaf into a roll is shown in figures three through seven.
Now that the blank for the core of the rose is ready, we begin to lay the petals of the future rose around this core. First, take a new maple leaf and place the roll core we have already made in the center of it. Pay attention to the fact that the front side of the leaf is inside the flower, as shown in figure eight.
Now we bend this sheet outward in half, so that the fold line is one and a half centimeters higher than the core. See figures nine and ten.

Now we also bend the protruding edge of the sheet outward, only now we do not smooth out the fold line. See drawing number eleven. We wrap the side edges of this double-folded sheet on both sides around the core, as shown in figures eleven through fifteen. 
Now we pinch the lower edges of the leaf at the very base of the flower as shown in figure sixteen.
As can be seen in figures seventeen through twenty-four, we take a new maple leaf for the next petal and repeat the sequence of actions described above. We now place the new petal on the side opposite the first leaf.
You can make several roses from maple leaves or even a whole bouquet using the above technology. The last pictures show a bouquet of three maple roses. As can be seen from these drawings, the bouquet can be decorated. To decorate the bouquet, the most colorful maple leaves are best suited. In order for the leaves decorating the bouquet not to curl up and shrink when dried, you can pre-iron them with an iron, after placing a maple leaf between the layers of the newspaper. True, in this case, the leaves will become more fragile, but if you handle them carefully, they will retain their shape for a long time. We evenly put these leaves in a circle under the maple roses and tie the finished bouquet at the base with threads.
The threads can be hidden by tying the bouquet with a decorative ribbon. A decorative ribbon will serve as a decoration; it is probably not worth replacing threads for tying a bouquet with it. This is how you can extend the summer by making an autumn bouquet of maple roses.

See what beauty can be made using multi-colored leaves. 


Autumn gives us a lot of materials for creativity. These are leaves of various colors, and chestnuts, and dried flowers, and acorns, and a decorative miniature pumpkin.
But, before you start making souvenirs from them, you need to properly prepare them, namely, dry them and, if necessary, varnish or paint them.
If you make crafts from unprepared raw materials, then this will be a short-lived product.
As soon as the material dries on its own, the souvenir will lose its shape and will have to be thrown away. And besides this, half-baked leaves can simply rot or become moldy.
Therefore, let's start by drying our autumn finds.
Let's prepare the leaves for the herbarium as follows:
1 way:
Put them between the book sheets and put them back on the shelf, pressing the other books firmly on the side. After about a week and a half, the leaves will become suitable for crafts.
This method is the best, since the natural color of the leaves does not change and then they for a long time do not break.
2 way:
This method is good if you do not have the strength to endure a week and a half and want to quickly get to work. Place the sheet between two white sheets of paper and iron on the lowest setting.

In this case, the yellow and red leaves retain their color, but the green ones can darken and become an ugly, brown hue.
We dry chestnuts, acorns and decorative pumpkin.
1 way:
Dry outdoors in the shade. It will be necessary to wait quite a long time before these materials acquire the dryness we need.
Sometimes this process takes a month. Especially it concerns decorative pumpkins, from which wonderful autumn crafts come out with their own hands.
You will see for yourself when the moment of readiness of the gifts of autumn comes. Acorns and chestnuts will become lighter, and the pumpkin will become like a rattle, as the cavity inside will dry out and shrink, and dry seeds will beat against the walls.
2 way:
We use the oven for this. It must be set to a temperature of up to 60C, and dried until tender, stirring occasionally.

The main thing is not to rush and do not set a high heat, as the fruits will simply boil and become completely unusable.
Drying dried flowers
There is only one way and it is long-playing. Flowers should be strung on a thread threaded through the stems and hung in a dry place, peduncles down.
Drying in a book or an iron will not work, so the shape will be lost and they will become flat. After the dried flowers are completely dry, they must be covered with a layer of hairspray. It will give them the right density and will not allow them to crumble at the slightest touch.
Well, now, let's move on to specific master classes and examples.
1. Panel of autumn leaves
We offer you a great DIY leaf panel idea. It is not difficult to make it, but the result is quite impressive.
It would be nice if you placed other autumn decor elements next to the finished leaf painting. For example, pumpkins, spikelets and other gizmos suitable in style. Then you will have a whole autumn ensemble.

What we need to work:
- 1. Dried maple leaves of yellow-red color.
- 2. Tree branch for the trunk
- 3. A piece of square plywood
- 4. Stain or dark varnish
- 5. Simple pencil
- 6. PVA glue
- 7. A bunch of dry spikelets
- 8. Wicker basket for pumpkins
- 9. A few Jack Be Little or Baby Boo pumpkins
If you do not have such pumpkins, then the basket can be filled with chestnuts and acorns. But next year it would not hurt to grow them, as they look very colorful and festive. Of course, if you have a piece of land.
See what a variety of varieties and how harmoniously they combine with each other:

Master class step by step:
1 step. Sand the board, paying special attention to the edges. They must be smooth.
2 step. Cover it with stain or varnish, preferably with a brownish tint. Apply the coating in several layers, trying to make the board not of a uniform color, but slightly “spotted”.
3 step. Freehand draw a large maple leaf.
4 step. Start gluing on the maple leaves. Start from the edges, gradually approaching the middle. The edges of the leaves should match the edges of the sketch as best as possible. The next row of leaves should overlap the previous one. Do not glue the ends, they should be “overhang” so that the effect of volume comes out.
5 step. Glue the selected branch in place of the stem.
Now hang a hand-made autumn panel over a cabinet and arrange other decorative elements around.
2. Topiary from a herbarium and other autumn materials

Topiary is an ornamental tree. In autumn, you can collect beautiful leaves and make such a wonderful and cozy element of decor.
Any leaves, dried flowers, acorns, spikelets will be used here. The main thing is to understand the essence and make the right foundation. And what to fill it with - fantasy will tell.
What we need to work:
- 1. Ceramic pot of soft color
- 2. Smooth tree branch for the trunk
- 3. 1 ball of foam rubber, polystyrene or special floral foam
- 4. Dry moss, sesame or a handful of beautiful pebbles, acorns, dry mountain ash
- 5. Glue gun
- 6. Gypsum dry
- 7. Decorative elements: herbarium, dried flowers, mountain ash, acorns, etc.
Master class step by step:
1 step. Let's start with the base. Take a styrofoam ball and put it on a branch that will serve as a trunk for you. Then remove it and drop glue from the gun into the hole formed. Reattach the ball and let dry.

2 step. Secure the stem in the pot. To do this, put a drop of glue on the free edge of the branch, attach it to the base of the pot.
Then, dilute the gypsum with water to the consistency of liquid sour cream and fill the container. Keep in mind that you will still need to decorate everything on top with moss or acorns, so leave a gap of about 3-4 cm from the top.

3 step. Now we insert leaves, dried flowers into the ball, sticking their stems inside. If you want to add acorns to the composition, then first put them on pieces of wire.
4 step. Now you just have to decorate the top of the pot so that the gypsum is not visible.
That's all. According to this simple scheme, you can make a variety of autumn crafts with your own hands, not only from leaves, but also from dry peas, nuts and other things. All of them will look just fine!
3. Roses from maple leaves

Looking at this elegant bouquet of roses, it would never occur to you that it is made from ordinary maple leaves!
But, nevertheless, it is so. It is enough just to learn how to fold them correctly and you will get a chic basis for many ideas.
Such roses can be included in various autumn topiaries, wreaths, compositions and panels. They look great in combination with any natural materials.

Well, let's get down to business.
What we need to work:
- 1. Maple leaves not dried
- 2. Thread or soft wire
- 3. Matte hairspray
Master class step by step:
1 step. We form the middle of the bud. To do this, fold the sheet as shown in the pictures below. Try to twist it as tightly and evenly as possible. First in half, and then sausage.

As a result, we should get something like this:

2 step. Now take the second sheet, fold it in half again and wrap the base around it.

The sharp edges of the maple leaves need to be carefully hidden inside, like this:

3 step. We continue to build up mass around the base, fitting more and more new leaves. If you want to end up with a bud, then twist it tighter, and if you ate a more lush rose, then loosen the twist a little.

4 step. When you see that a real rose has “bloomed” in your hands, you need to fix it with threads, as tight as possible.

5 step. We cut the edges with scissors and put the rose on a lining of leaves, preferably already dry. We cover the composition with varnish and admire!

Such roses from leaves stand for a long time, for the whole autumn season it will definitely be enough. You can make as many of these colors as you like. The more of them, the more chic this autumn composition looks, resembling a fabric motif in appearance.
4. Compositions from decorative pumpkins
Even if you do not grow this vegetable on your site, in the autumn you can freely buy them on the market and then dry them yourself. How to do this, we have already told above, so let's not waste time talking.
Let's get creative!
There will be no master classes in this block, we will just show you examples of such decor, and how to make them is quite clear from the photo.
Of course, there are more complex techniques, for example, carving or painting on dry lagenaria, but this topic is extensive and worthy of a separate article. Here we will consider only the simplest compositions that even a schoolboy can do.
1 option. Basket with a scattering of pumpkins. It couldn't be easier, but the view is spectacular!

Option 2. Candlesticks from mini pumpkins. To do this, you need to cut a hole large enough with a knife so that you can put a foil-based candle in it.

Or this option:

Incredibly simple, right?
3 option. Wreath on the door of pumpkins. Take any circle as a basis, for example, an embroidery hoop, and attach mini-pumpkins to it.
Pierce the tails with wire and screw it to the base, circle. As additional decorative elements, use berries, acorns, twigs and autumn leaves.
It will look something like this:

5. Chestnut Topiary

To create this spectacular do-it-yourself autumn craft, we will need the same materials for the base as for creating a decorative herbarium tree. And for decoration, you just need other elements.
For work we need:
1. Ceramic pot
2. Styrofoam ball
3. Gypsum dry
4. Glue gun
5. Tree branch for the trunk
6. Cones, chestnuts, acorns
7. Harsh thread or twine to form decorative balls
Master class step by step:
- 1. We form the base of the tree in the same way as in the case of the leaf topiary.
- 2. We fix the base in a pot with glue and plaster
- 3. We apply drops of hot glue to chestnuts, acorns and other elements and randomly attach them to the foam ball-crown.
- 4. A wreath on the chestnut door

Such a wreath of chestnuts on the front door will cheer up not only you, but also passers-by. It is very easy to make it. Follow all the steps given for making a pumpkin wreath.
Find some kind of dense base, then pierce the chestnuts and other elements through the reverse side, insert the wire, form a hook and use it to screw them to the circle.
Complement the chestnut composition with leaves, acorns, berries and other autumn decorative elements that this fertile time of the year gave.
6. Autumn garland "Leaves" from salt dough

This is a very spectacular autumn craft with your own hands. The big advantage of such a garland is that it is not seasonal and will decorate your home for many years.
After all, it is made not from natural materials, but from salt dough, which does not deteriorate for years. The only thing is that such products are fragile and must be handled with care so as not to break. But, even if this happened, they can always be glued together, but the joint will not be noticeable.
What we need to work:
1. 2 cups flour
2. 1 glass of salt
3. 0.5 cups of water
4. Gouache
5. Sewing pins with hook eye
6. Twine
7. Oven
8. White landscape paper, pencil
Master class step by step:
1 step. We draw patterns of leaves of various types on the landscape sheet, but approximately the same size. We cut them out.
2 step. kneading hard dough flour, salt and water. If the dough turns out to be non-plastic, then liquid can be added drop by drop. Mix well the resulting material and roll it out on the board. The layer should be approximately 5-7 millimeters.
3 step. We lay out the templates on the rolled out dough and cut them along the contour with a knife.

As a result, we should get about as many blanks.

4 step. We make holes with pins and carefully fix the heads. On them we will hang our leaves. We squeeze out the veins with a knife.
5 step. We dry the dough in the oven at a temperature of 50-60C until completely dry.
6 step. We color the blanks from the dough with gouache, trying to make natural tones and transitions.

7 step. We string the garland on the twine, making a knot over each leaf so that they do not move.

So our autumn do-it-yourself craft is ready. You can hang it anywhere, it will be in place in any corner of the house, especially if you have some other autumn-style decor elements.
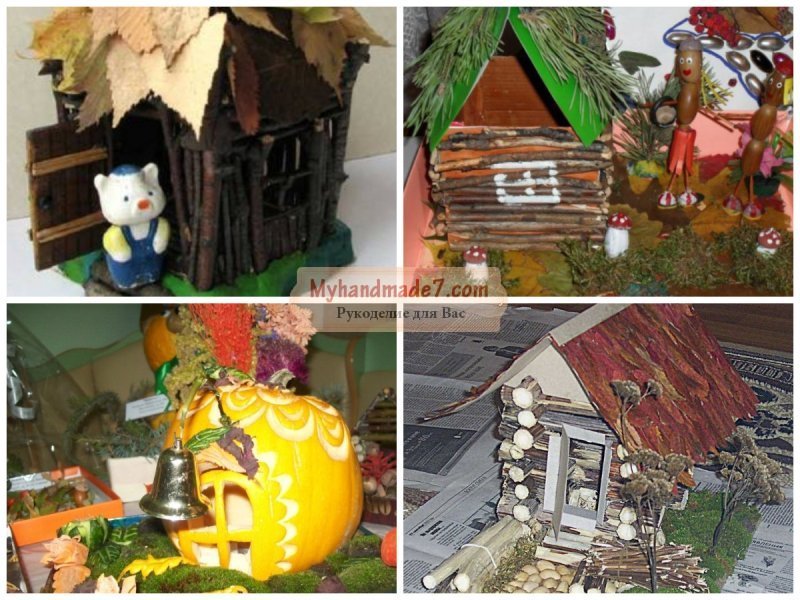
7. Vases and houses from an ordinary pumpkin
Autumn is the season for pumpkins. It costs mere pennies and finding a beautiful shape and coloring is not difficult.
And to make an element of autumn decor on its basis is as easy as shelling pears! No need here step-by-step technologies and accessories.
All you need is pumpkins, a carving knife, and a tablespoon to pick out the pulp and flowers to fill these colorful vases.
Look at our selection of photos of pumpkin vases. Looks very dignified and autumnal.


As you already understood, you only need to cut off the top and clean the core of the vegetable. Then fill the container with water.
And you can make houses out of pumpkins. To do this, you just need to cut holes in the right places. Where exactly they are located, you can see in the picture below. Kids love these things!

8. Wreath on the door made of natural materials
We have already given above an example of wreaths of pumpkins and chestnuts. How to make them - you already know. Here we just give a selection of the most spectacular, in our opinion, ideas.


9. Frame of acorns for a photo or a mirror
Decorating any base in this way is very simple. We think no explanation is needed here.
The only thing we can advise is that you should not glue acorns on a glue gun or PVA. Much better if you use plasticine.
Because, most likely, you will soon get tired of such decor and have to throw it away. And so, you can always dismantle the acorns and get a regular photo frame back into use.
This is how it will look like.

There are whole acorns on the photo frame, and only hats on the mirror. Thus, you can create a variety of autumn crafts with your own hands and decorate any surface: caskets, bread boxes, and more.
10. A bunch of acorns

This autumn craft will look best if you paint the “berries” in natural colors, and instead of grape leaves add a maple herbarium of various colors.
Also, a bunch of acorns is a wonderful element of any autumn wreath on the door or a large topiary. After all, it can be made not only desktop, but also in human growth!
Only instead of a foam ball, you need to take some large, plastic one. Grapes from acorns are made very simply, we will now tell you exactly how.
What we need to work:
1. Acorns without hats
2. Shilo
3. Wire
3. Glue gun
4. Acrylic paint
5. Autumn leaves for decoration
Master class step by step:
1 step. We pierce holes in the base of the acorn with an awl.
2 step. We break or cut the wire into pieces 7-10 cm long.
3 step. Dip the ends of the wire in a drop of glue from the gun and insert into the punctured holes.

4 step. We paint acorns in any color you want. The main thing is that it is combined with leaves that will complement the composition.
5 step. We collect acorns in a bunch, forming a wire rod on top. Then we attach leaves to it.
Now you can make any decoration based on this fall craft. Panel, wreath and more.
11. Autumn crafts from felt
Working with this fabric is a pleasure! The material does not crumble, perfectly holds its shape. And this means that any beginner can make an autumn craft from felt with his own hands and it will turn out no worse than the products of experienced craftswomen.
We offer you a selection of the best and simple decors in autumn style, and you already choose any of them! They are so simple that they do not need to describe in detail their step-by-step technology.

As you can see, on the basis of felt leaves, you can make both a wreath and a garland, like the one we already made from salt dough. Here are a couple more options for do-it-yourself autumn wreaths.

All you need to do is draw patterns, cut out the felt and decorate it according to our photos.
12. Pigtail of garlic and red pepper

How cozy it is when bundles of garlic, onions, red peppers hang in the kitchen! But if you hang them fresh, they will very soon lose their appearance or simply run out, because they will go to food.
Let's do something like this, but for the ages! Now we will look at how garlic and pepper are made, from which we will form a pretty braid for the kitchen.
For work we need:
1. White nylon tights or plastic bag (for garlic base)
2. Cotton wool or synthetic winterizer (for filling)
3. White harsh thread (for dressing and forming lobules)
4. Glue gun
5. Buckwheat or twine (to simulate garlic roots)
6. Fabric for sewing peppers or salt dough for modeling it
Master class step by step:
1 step. We form the body of garlic. To do this, we need to cut into squares or nylon tights or simple plastic bags. Garlic made of nylon looks, of course, more realistic.
But the package looks good too. But most importantly, this material is always at hand. So, cut out a square, about 7 by 7 cm in diameter.
2 step. We roll a ball out of cotton wool or synthetic winterizer, put it inside a flap of nylon and form a head of garlic. It looks like it is shown in the photo.

3 step. Then we begin to tie the head with a harsh thread, forming garlic cloves. First, divide in half, then into quarters, then into 8 parts.
Look at the photo, the process is clearly shown there.

4 step. In the place where the roots of real garlic are located, we drip a drop of glue and sprinkle this place with crushed buckwheat. If you want, you can replace it with twine, which needs to be unraveled and finely chopped.
5 step. We make a pigtail out of twine and attach the resulting garlic cloves to it.
6 step. Now it's time to do the pepper. You can sew it, but a pepper made from salt dough looks much better.
We have already given the recipe for kneading, in the subheading “Garlands of autumn leaves”. This is how the peppercorns should turn out in the end.

7 step. We make holes in the tails of the peppercorns (we will then thread the twine into them and with its help we will fix them on the pigtail with garlic). You can do this with an awl or any item at hand.
The main thing is to make them large enough so that you can thread the thread freely later. Otherwise, after drying, you will not be able to attach the finished product to the composition in any way.
And one more thing: if you make a hole, make sure that the edges of the legs remain more or less large. Otherwise, after you pull the thread, the thin walls may crack and the pepper will fall to the floor.
8 step. Dry in the oven, paint with acrylic paint, after drying, cover them with varnish. When the pepper shines, it looks more natural.
Dry at a low temperature, do not rush, because otherwise, your work may burst and you will have to sculpt everything again. Cracked peppers can no longer be painted the way you would like.
9. We fasten the pepper to the garlic and hang this autumn composition in the kitchen. You can make several of these links. You can make carrots from salt dough, and from brown tights you can make an onion bunch.
The principle of making bulbs is the same as garlic, only even simpler. Slices do not need to be formed.

Also, a bunch of mushrooms on the wall will look great, which you can also mold from dough and paint realistically.
This is the end of our long review. You saw many examples and any kind of autumn crafts with your own hands. We really hope that our master classes will be useful to you and you will definitely take something into service.
Through creativity at an early age, the child gets acquainted with the world around him, performing crafts "Autumn" in kindergarten he studies new materials, learns to work with them and with auxiliary materials. During the creative process, the child's fine motor skills of the hands work, which is very useful for overall development. Being engaged in creativity from an early age, the child receives a comprehensive intellectual development, and even develops the speech apparatus.
That is why it is important to instill a love for creativity from an early age, as soon as the baby can work independently with the safest materials. At the first stages, he will definitely need the help of his mother, and then he will already make original ones on his own. And let parents not think that creative activities are just entertainment for kids or a pleasant pastime, because everything that preschoolers do with their own hands forms their personality, and it depends on parents whether they can reveal the creative potential of the child.
When a child works with his hands, whether it's modeling or drawing, or, he develops fine motor skills of his hands, which stimulates all the centers in the preschooler's brain, including the center responsible for speech.
It is important not to get hung up on one type of needlework, for example, if you have chosen modeling for a child, then you should not give preference only to working with plasticine, because there is also clay prepared by yourself salty dough, as well as seasonal outdoor activities - modeling from snow and sand. Working with each material, the kid learns the specifics, because somewhere it is necessary to knead the plastic with effort, and some materials are very malleable and plastic. Thus, the mobility and strength of the fingers change, the coordination of movements improves when working with small elements.
The creative process captivates the child so much that he becomes focused, diligent, more purposeful, because with the help of his parents he will definitely bring the matter to the end in order to demonstrate to everyone crafts in kindergarten theme "Autumn", photo the very first successes of your baby will be stored in the family archive.
Even performing a simple application, a preschooler will learn to sort objects by shape and size, by similarity, if he works, for example, with autumn leaves, and you can also invite him to make a mosaic using various seeds, grains and legumes.
In the process of learning various materials, the kid will understand how certain things are made, for example, a snowman will now be not just an incomprehensible figure made of snow, but three balls of different shapes stuck together.
Crafts in kindergarten on the theme "Autumn" contribute to the development of imagination and fantasy, accelerates thought processes, because if for the first time the baby will think for a long time what kind of leaf to take, then over time he will perform all actions instantly.

Crafts "Autumn" in kindergarten
Do-it-yourself autumn crafts for kindergarten are always accompanied by a fun journey, because in order to collect the necessary materials, you need to go with the whole family to the forest. In autumn, in a deciduous or coniferous forest, the necessary tools for creativity literally lie underfoot or hang from tree branches.
Adults at this time can search for mushrooms or pick berries, and children will put even multi-colored leaves of different sizes and shapes, large and small cones, acorns and their hats, small even twigs and Christmas tree needles into their basket. All these simple materials, so familiar to us in everyday life, can open up a whole new world to the baby.

It will be interesting to work with colorful leaves for the crumbs throughout the year, in the cold winter months, when walking along the street becomes impossible due to bad weather, you can cheer up the whole family if you offer to do it together.
The leaves collected since autumn should be laid out between the sheets in a thick book. Thus, they will dry out, remain even and retain their color. If you need to quickly dry only the plucked or collected leaves, then you can use the iron. It is necessary to go through the leaves several times with a hot iron, and they are ready for the application.
Crafts in kindergarten on the theme "Autumn"
In one craft, you can combine several types of creativity. For example, you can take autumn materials and plasticine and make original figures or make a picture using not only paints and felt-tip pens, but also yellowed foliage.
For the smallest craftsmen, you can suggest working not with whole leaves, but with small pieces that will simply be poured onto a surface smeared with glue.

Dried leaves should be cut or broken into small pieces of arbitrary shape. It is better to take multi-colored foliage, then the application will be bright, colorful.
With paints or a pencil, you need to draw a trunk and branches on a piece of paper, then glue the part of the tree where the crown should be with glue. Sprinkle this area with chopped leaves and press down a little with your fingers. The crown should turn out to be voluminous and openwork. For example, for a crown, you can take a mixture of yellow and red, and make a lawn of green crumbs under a tree. When the material sticks to the surface, it is necessary to turn the base over so that all the extra elements that do not stick fall down.

"Gifts of Autumn" - crafts for kindergarten
Composition "Gifts of Autumn" - crafts for kindergarten, which can be prepared for an exhibition of children's creativity, and it is always held in October so that children can demonstrate their creative success. In addition to beautiful crafts, you can also make functional baskets that will not only please the eye, but everyone can treat themselves to ripe fruits - apples or pears.
The basket itself can be made from a large pumpkin by removing all the pulp with a spoon and drying the fruit on a warm battery for several days. Drawings or ornaments can be cut out on the peel with a sharp knife, and the edge of the cut can also be made not even, but carved.

You can fill the basket with grapes, heavenly apples, small pears, dried apricots and other small fruits, and additionally decorate with rowan twigs, beautiful yellowed leaves.
Of course, a child cannot make such a basket without the help of their parents, because it is difficult to work with a pumpkin, and besides, it is necessary to use a sharp knife, which is not safe for preschoolers.
But even from an ordinary plastic bowl, you can make an original basket for an autumn composition using acorns and hats from them. Acorns and caps should be glued all over the plastic base, leaving no gaps. The handle for the basket can be made from several twigs of the vine, intertwining them together.
Without a doubt, such crafts for the autumn holiday in kindergarten take center stage in holiday table which parents will cover for children.

Craft "Golden Autumn" in kindergarten
The tree of happiness is bright craft "Golden Autumn", in kindergarten it can be done by a preschooler with the help of a mother or older sister. We know that various topiaries are one of the most popular types of needlework today. To create them, they use all kinds of materials that are at hand: coffee beans, pine cones, acorn caps, autumn leaves, and a child can make his first topiary with rowan berries.
These can be done by the whole family, having fun. In addition, the baby will perform only the simplest steps of the craft, so you can not do without the help of adults.

A tree can not only be demonstrated at a competition at a school or kindergarten, but also put at home, adding bright colors to your interior, you can see how beautiful it turns out craft "Autumn" in kindergarten, photo and be sure to present your results in the comments, this will serve as inspiration for other craftswomen.
The basis for the topiary will be a foam ball, if you did not find it in the store, then you can cut a spherical even shape from any thick piece of foam.
The trunk of the tree is made from a long, even stick or branch (several skewers can be fastened together), and then the trunk must be decorated by wrapping it with a rope that has a natural texture, so it will easily fit into the concept of your natural crafts.

Craft "Autumn" in kindergarten: photo
To make crafts "Autumn" in kindergarten, it is necessary to prepare in advance all the necessary materials and think over all the stages of the work. In addition to the trunk and the foam crown, which we will decorate with rowan berries, we must also find a pot where we will plant our tree. A small glass, a cup, a decorative plastic pot, an iron tin can are suitable for us. The pot can also be decorated with a tourniquet, glue coffee beans on it.
We will attach the berries to the foam base using stationery or sewing pins, and you can also use small carnations. Each berry must be pierced with a pin in the middle, and when all the elements are prepared, you can attach them to the base. The pins easily enter the foam and hold securely in it.

To hide the white base, you can first glue it over or simply wrap it with gold or orange crepe paper. It is necessary to fasten the pins as tightly as possible so that the base is practically invisible, for this it is necessary to prepare berries of different sizes and fasten them in a checkerboard pattern.
Near such a bright tree, you can plant a hedgehog made from a pear in a clearing, because the kids really like to do crafts from vegetables in kindergarten, autumn gives us a huge selection of different fruits and berries.
You will also find many ideas for autumn creativity with children, the main thing to remember is that you can use absolutely any materials, because if you show your creativity, then you can make an original decorative figure from an ordinary plastic bottle, not to mention various openwork fluffy cones and leaves , which even without additional decoration look simply charming. Be sure to make a wreath for the fall festival that would decorate your front door, and it will be replaced by a Christmas wreath on New Year's Eve.


