The most popular among professionals, the Photoshop graphics editor is distinguished by its wide possibilities in the processing of graphic images and the toolkit that is difficult for the average user. Combining two images is a technologically straightforward process that does not require much experience and special skills.
Merging photos means several ways, depending on the final result that you want to get: merging can be in the form of a neat “gluing” of two images on a sheet, it can be an overlay of one photo on another (one of them becomes the background), or it can also be combining-mixing two images into a single whole.
Quick article navigation
Photo stitching
The easiest way to merge two photos in Photoshop is to place them on the same plane. It is important that the dimensions of the photos are the same, otherwise the quality of the final image may be lost when adjusting the width and height. To implement a simple merge, you need:
- Open two original photos;
- Go to the menu "Image" -> "Canvas Size". In the window that opens, double the width and height parameters. In the same place, select the direction of expanding the canvas to the right and click "OK";
- On the toolbar, select “Move Tool”, move the cursor over the second photo and move it to the white field to the first;
- Go to the menu "Image" -\u003e "Image Size" and set the desired size parameters.
Blending effect
The combination of two images with an artistic blending effect is mainly used in advertising or in the production of posters. For such a combination of photos, you need:
- Open two original photos in Photoshop (for example, vertical photo #1 and horizontal photo #2);
- Select the Move Tool on the panel and use it to drag photo #2 onto photo #1 (the top image should overlap the bottom image by more than half). Two layers appeared on the layers palette;
- So that the borders of the horizontal photo No. 2 do not go beyond the borders of photo No. 1, by pressing the cursor you should activate the top layer and use the Free Transform Tool or Ctrl + T to align the layer to the size of the canvas;
- Press Ctrl+O to fit the top layer into the canvas;
- If there is a need to move the bottom photo No. 1, you should rename this layer from the Locked Background to Layer 0 (Layer 0) by double-clicking on the layer with the mouse while pressing the Alt key;
- Select the tool “Move” (Move Tool) on the panel and holding down the Shift key, slightly pull the bottom photo No. 1 up;
- Select the top layer and click on the layer mask icon in the layers palette;
- Opposite Layer 1 (Layer 1) there is a mask that needs to be filled with a black and white gradient using the Gradient Tool;
- Press Shift while selecting the layer mask with the cursor;
- By clicking in the right place in the image, start drawing a gradient in the place where mixing is intended;
- Select Layer 1 (Layer 1) and press the key combination Ctrl + Shift + Alt + E to merge the layers into one.
If desired, filters, noises, and additional adjustment layers can be applied to the resulting “mixed” image.
23.06.2015 27.01.2018
Photoshop tutorial in which you will learn how to combine several photos into one using Photoshop. In fact, everything is very simple and I wrote this detailed step-by-step instruction especially for you.
We will make such a composition from photographs. Here 6 photos merged into one image.
- Of course, this is a reduced copy, especially to fit on the site to show as an example.
- Of course, having understood the whole essence of the method, you can create your own collages and templates. Place photos as you like, anywhere and as much as you want in one image.
Where to begin? From planning. Most Photoshop users do a lot of extra work to create such a small collage. As usual, this happens - photos are scattered around the working field by eye, they will be reduced here, they will be reduced there, they will be cut here, they will be cut there, and so on. I try not to work like this to save my time and increase productivity.
So first you need to prepare a template. What will it give? Firstly, you can immediately and accurately arrange photos according to the intended template. Secondly, if necessary, you can quickly and easily insert new other photos using a template. In my opinion, the advantages are obvious.
Create a new document in Photoshop with a size of 989x676 pixels.

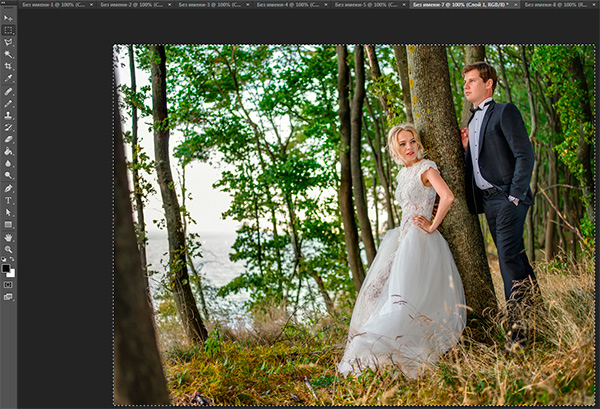
Also, immediately open all 6 photos that you will use in Photoshop. You will see that they all open in different tabs. Leave the new created document tab enabled, where we will create the template. There will be 7 tabs in total.

Now we will create places for photos. We will use the tool Rectangle(Rectangle), it can be found in the toolbar on the left.

Use any color for the rectangle, as long as it's not the background color so it doesn't blend in.
Position the first rectangle on the image. Here you can make, actually by eye, its length, width and location on the working field. But try to stick to the scheme that we conceived at the very beginning.
The first rectangle is the main large photo. I marked the borders of the image as a box so that you understand how I positioned the rectangle on the white background.

Draw the rest of the rectangles in the same way.
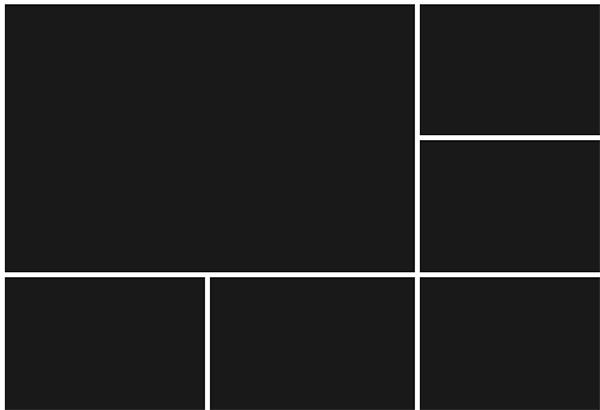
As you can see, I placed them at the same distance from each other, so that everything was smooth and beautiful.
Arrange the rectangles without paying attention to the empty areas of the image that remain in different places. After you arrange all the rectangles as you intended, you can crop the image (working field) from unnecessary - using the tool Frame. You can also find it in the panel on the left.
The layer list will look like this:
Now let's add photos.
Go to the tab with any photo, select it all with the tool Rectangular area or just by clicking CTRL+A. Click CTRL+C to copy to clipboard.
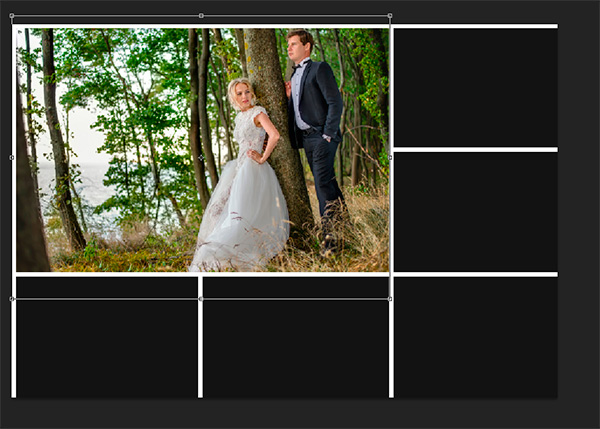
Go to the tab with our template and select in the layers the layer with the rectangle instead of which we want to insert a photo. In this case, it is the largest rectangle. Click CTRL+V and the photo is inserted on a new layer that will be above the rectangle - this is important.

Now right-click on the photo layer and select Create Clipping Mask.
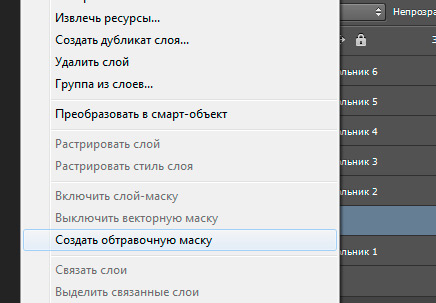
A clipping mask has been created from the photo and is applied to the layer below. And the layer below is our rectangle. What does it mean? This means that the photo will only be displayed within the bounds of the rectangle.

Here's what it looks like at the moment.

It remains only to reduce the scale of the photo so that you can see it all. This can be done in clipping mask mode, no glitch will occur.
What should be done. Select the photo layer and click CTRL+T- so we can transform the photo.
There are squares along the borders of the photo - we drag them with the mouse and the photo will decrease. For example, holding SHIFT and dragging the lower square diagonally upwards, the photo will decrease proportionally.
.jpg)
We reduce the photo and move it a little up, so that the photo is displayed as much as possible in the visible area.
Press ENTER and the first photo is ready.
Take the same method for all other photos. Select the rectangles, paste the photo on a new layer and make clipping masks, then adjust the size of the photo. Everything is like with this photo.
Gradually, you will take all the photos. Thus, we completed the task set earlier - we combined several photos into one image. Thus, they created their own simple collage of photos.

You can download the PSD template of this work. To see how things are set up.
Good day to all, my dear readers! As always, Dmitry Kostin is with you, everything is unchanged here). I'm looking, many are interested in how to combine two photos into one in Photoshop. It just happens that people want to make a comparison, for example, BEFORE and AFTER, or something else.
You probably saw that when people post their weight loss achievements, they also post BEFORE and AFTER photos combined into one. By the way, I did the same when I wrote . In general, today I will show how this can be easily done. So snap your fingers and let's go!
wanted to tell you the most fast way, but I decided that I shouldn’t repeat myself, since I already talked about it in a lesson about . It will turn out that you will have one photo in another. Let's focus on other ways.
Joining two images
In this example, I decided to merge photos in the style of "Before and After". Don't tell me that these people are not similar. They are two different people.) In general, open two photos in photoshop, and then in order. I took photos of two people: thin and embossed.
- First, let's make the images the same height. To do this, being on each photo separately, go to the "Image" menu - "Image Size". Look at the number of pixels by height. It turned out that the skinny one has 680 pixels, and the pumped up one has 1329.
- In this case, it is better to reduce the size of the swapped image to 680 pixels in height in order to equate them and not lose quality. Do you know how it's done? If not, then we look at my article about (although everything should be clear anyway). And by the way, remember the horizontal size of the pitching image. I got 487.

- Now go to the skinny photo and go back to the "Image" menu, only this time choose "Canvas Size". Here we will simply increase the working area without increasing the photo itself. So the horizontal size of a skinny photo is 453 pixels. Mentally add 487 pixels (horizontal size of the pitching photo) and get 940. It is this number that we write in the width cell. At the same time, we do not change the height and leave 680.
- Now we need to choose which side these new extra 487 pixels horizontally will appear on. If we leave it as is, then the canvas will increase on both sides by 243 and 244 pixels (487/2). But we want to do a "Before and After", which means the skinny person should be on the left, hence the empty piece of canvas on the right. Then, in the location, click on the left arrow to move the center to the left. you can also choose a background color, but in our case it is not necessary, any will do, since we will close it anyway. Then click OK.

- See? Now we have a huge piece of white background. Now go to the photo of the inflated, take the tool "Move", hold down the left mouse button on the photo and drag it to the tab with the photo of the skinny.

- It's a matter of small. It remains to move the photo directly to the white background. We accurately calculated the width and adjusted the height so that everything should fit exactly.

Here is such an uncomplicated and easy way combine two images).
Merging with a smooth transition
There is another interesting effect when the transition from one photo to another is smooth. Let me do this using the example of two animals: a lion and a saiga.
- Open the lion and saiga image in our editor, but in different tabs.
- Go to the lion layer and select .
- Now select and make sure the transition is from black to white. And now with this gradient draw a line approximately in the middle, as shown in my picture.

- You have a part of the image with a lion should be painted over with a red tint. Fine. This is what we need. Now look at the layers panel and look at our active lion layer. Is he the main one? Those. is there a lock on it? If yes, then click on it with the left mouse button so that it disappears, otherwise we simply will not be able to edit this layer.

- Now remove the quick mask mode by clicking on its icon again. You will have to highlight part of the image with a dotted line. Then press the key DELETE and make sure the content is worth "Content Aware", then press OK. You should remove the right side of the image, and with a smooth transparent transition. Just deselect (just click once with any selection tool, such as a rectangular area).

- Now go to the tab with the saiga (damn, the animal and the name are still funny). It is desirable to compare the height (in pixels) of these two images, as in the previous example. Now we take the "Move" tool and drag the poor saiga straight to the lion.

- And now the trick (just kidding, of course this is not a trick). We hold the layer with the saiga on the layers panel (poor animal, we are holding it again) with the left mouse button, after which we drag it down so that it is below the lion.

- See what happened? The king of beasts and the antelope are combined into a single photo. Cool! You can move the antelope a little using "Move". We look. A smooth transition succeeded. It worked out quite well in my opinion. Cute and unobtrusive.

Well, in general, something like that.
Of course it's photoshop. And there are still many ways to combine several photos into one. But I think that for a start, these methods will be quite enough for you. Moreover, in the last version, we did not just link 2 pictures into one, but made a simple collage, i.e. use several different images in one.
By the way, if you want to make amazing collages, then I highly recommend you to watch great course on the subject. Numerous examples have been thoroughly considered. From a few simple images, you will learn how to make simply masterpieces, so go ahead!
Sincerely, Dmitry Kostin.
In terms of popularity, an omelet in the form of breakfast can compete only with cereals. It is eaten all over the world - with vegetables, herbs, cheese, baked, fried. There are dozens of cooking recipes. From the article you will learn about what a diet omelette is, a recipe and ways to diversify this dish.
Useful properties of an omelet
An omelette is an egg dish that has been familiar to each of us since childhood. It is easy to prepare, it does not contain expensive ingredients, but it is very tasty. V classic version you just need to beat the eggs with a mixer or whisk, add milk, salt and pour the mixture into the pan. You can decorate it at your own discretion with herbs and other ingredients. A combination of multi-colored vegetables, melted cheese - such an omelet will not only be satisfying, but will also please you with bright colors and an appetizing look. Diet omelette is a source of protein for those who are a supporter proper nutrition, diets and sports.
The benefits of an omelet are:
- the presence of a complex of vitamins - A, B, B6, D, E, B12 and folic acid;
- minerals and trace elements - iron, potassium, copper, phosphorus, selenium, lutein, etc.;
- amino acids;
- squirrel.
All trace elements are in perfect balance in a chicken egg, from which an omelet is made. Two eggs a day is 50% daily allowance beneficial substances for the human body.
omelet calorie content chicken eggs, is only 120 kilocalories per 100 g. If you add milk to it, it will increase to 115, and vice versa with tomatoes - 99. squash omelette for a couple - this is a godsend for those who want to part with extra pounds or have a tasty and healthy meal - only 60 kilocalories.
nutritious protein dish for a full breakfast on a dietDiet omelet recipes
Omelet in a pan without milk
The classic French omelette is prepared without milk, but it turns out to be extremely tasty. Initially, according to the recipe, warm water is poured into the whipped mass. butter, however, in order for it to remain dietary, this should not be done.
- chicken eggs - 3 pcs.;
- water - 1 tbsp. l.;
- spices.
To prepare such low calorie meal need to:
The whites are beaten separately from the yolks. The yolks are gradually poured into the whipped mass, continuing to beat. Then - water and spices are added, all the time using a whisk or mixer. Grease a frying pan of a suitable diameter with oil and fry the omelette under a lid over high heat until it starts to rise. As soon as the omelette has become magnificent, you can reduce the fire, detect two minutes and, after their expiration, remove from the fire.
Such a simple recipe is a quick and convenient option for a low-calorie healthy breakfast.
Steamed squash omelet
In the season when young zucchini appear on the beds, you need to not only cook them, but also store them for the winter. Frozen, they keep well in the freezer.
Steamed squash omelet is prepared using a double boiler or a slow cooker that has this function. The recipe is perfect for serving kids:
- chicken eggs - 2 pcs.;
- zucchini - 1 pc.;
- milk - 1/3 cup;
- salt to taste.
Mix chicken eggs and milk and add salt. Whipping is not required. Then everything is poured into a special container in a double boiler. Thoroughly clean the zucchini, and cut into small cubes, add to the double boiler to the eggs. Cooking time - 30 minutes.
Steamed omelet without a steamer
If you do not have a double boiler, this does not mean that you will not be able to cook a healthy diet omelette. For the recipe you need:
- chicken eggs - 2 pcs.;
- sour cream - 2 tsp (or chicken broth / milk - 4 tablespoons);
- water - 2 tbsp. l.;
- salt.
Mix all the ingredients with a whisk until the mixture becomes homogeneous. Pick up omelet molds. Any that can be heated will do. They can be small, such as for cupcakes. They need to be lubricated with oil (silicone can not be lubricated). Put the forms with the omelette mixture in a colander, close it (you can with foil). Boil water in a saucepan, and then put a colander in it so that it does not touch the water, but is well steamed. After 15 minutes, the omelet will be ready.
Diet omelet with tomatoes and milk
Tomato and milk are a classic omelet duo. In order to prepare this dietary dish, you need:
- chicken eggs - 5 pcs.;
- milk - 200 ml;
- tomatoes - 600 g;
- salt, pepper to taste.
If desired, you can reduce all the ingredients by half or increase proportionally.
First, put the tomatoes in a pan and evaporate the liquid from them. Then mix the eggs and milk, add the spices and pour over the tomatoes. Close the pan with a lid and fry everything until tender, shaking the contents occasionally. Such an omelet is being prepared for about 10 minutes, the time depends on what degree of roasting you prefer.
Diet omelet with cheese
A dish that contains cheese is unlikely to be called low-calorie. However, you can change its content down and choose low-fat varieties. As a result, you get an excellent tender omelette that even children will love. You will need:
- chicken eggs - 2 pcs.;
- milk - 4 tbsp. l.;
- flour - 2 tsp;
- vegetable oil;
- hard cheese;
- herbs, salt, pepper.
To start, beat eggs with milk and salt, add flour. You can choose not only wheat flour, but also more useful rye or corn. Prepare a frying pan, brush with oil. Pour the mixture over it and fry over low heat until the mass does not drain when tilted. Add cheese and herbs to the resulting pancake and roll it into a roll. Under the lid, you need to hold it for a minute and remove from heat.
An omelet can be prepared in different ways even every day. This will allow you to diversify the menu and not get fed up with it. In addition, you don’t even need special steamers and mixers, they are easy to replace with a colander and a pot of boiling water, a whisk and a fork.


