Good day everyone! February 14 is followed by another holiday, which is celebrated in our country annually on February 23. Last time we talked about what, and also did with the children
Today we continue and will, together with the children, congratulate our defenders and make interesting and original cards for them.
This type of work for schoolchildren or kindergarteners is the most common. Because it is not so difficult to make such a miracle, you just need to listen to the instructions of the teacher and everything will work out.
So, if you have not yet decided to do this and give it as a gift, then perhaps you will stop at this option.
On this day, all mothers, daughters, grandmothers and indeed the entire female half of the population congratulates the male half on this celebration. It just so happens that the symbols of this holiday are state flags, military equipment and other vehicles, as well as stars on shoulder straps.
Therefore, all drawings or pictures are directly related to this. I propose to make the first option out of paper - this is a tie using the origami technique.

And I also really liked the idea with a dollar bill, or you can take our rubles and roll it up, like this, it looks pretty cool, and as they say, a small stash is at hand.

For the smallest craftsmen of the second junior group kindergarten you can do the work of plasticine.

Now we will make a postcard on which the car will be depicted. Such an adorable and fun creation you can make with older and preschool kids, or use in elementary grades.
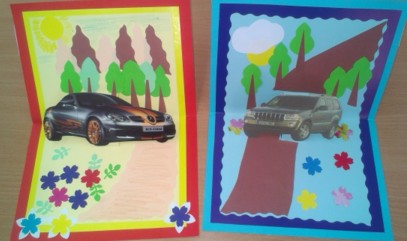
Stages of work:
1. Prepare everything you need for work, these are paper, glue, scissors and pictures with cars.

2. Cut out the necessary details to complete the plot.

3. Then, to make the machine seem voluminous, make an incision, while folding a sheet of paper in half.

4. Here is such an interesting and cute story.

5. You can decorate the outside as you like, using various decorations and decors.

6. You can do it as an application, or simply draw with colored pencils or felt-tip pens.

Cool design in the technique of scrapbooking
I give you a few ideas that impressed me, you can take them as the basis of your work and create your own plot. See how bright you can make a star.

Miloi is very talentedly executed, even a flower is not at all superfluous here.

Wow, a message or a little surprise).

In general, it looks wonderful and not primitive.

So, do something for everyone!

And surprise, in general, act.

And I also offer you a step-by-step instruction that you can take for your creative work in the scrapbooking style, here:
Original ideas for greeting cards for schoolchildren on February 23 with templates
I want to make and decorate a postcard in a special way, I know that many are interested in options for bulk products, because they look great and amazing. Moreover, if there is a step-by-step instruction, then you and your children at school can do such a miracle.
Or you can create this creation at home, and then your son or daughter will give it to dad.
Stages of work:
1. First of all, you will need to find a double-sided cardboard, it is advisable to take blue or blue, this will be the background of the sea. Then fold the blue sheet in half and glue the base in the form of a boat to it.

2. Accordingly, in order to glue the base from the ship, you first need to make it, for this, find the image of the ship or ask me for a template, I will send it to you for free by mail. So print it on A4 sheet and cut out the desired image along the contours with a clerical knife.


4. Glue the white base gently to the blue base.

5. This is how it should work out for you.

6. Looks just fantastic beautiful and charming.

You can make a simple application from colored paper and from geometric shapes, for this, draw patterns, and glue the composition on them.


You can go another simple way, print this sample, and then color it or make an application.

I liked another type of postcard, I am happy to show it to you.
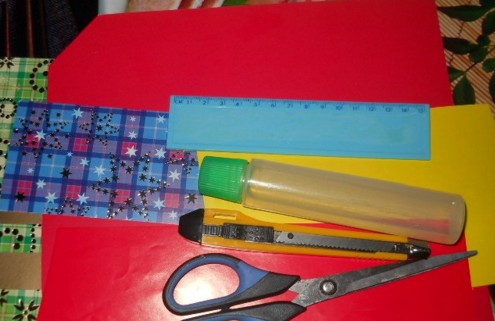
We will need:
- colored paper or cardboard
- scissors

Stages of work:
1. Draw the templates, as I showed you in this picture, it’s not difficult, even a beginner can do it. But what color to make for each workpiece, decide for yourself, this is a creative work that can be done in a labor lesson.

2. For the base, it is best to take colored cardboard or double-sided or plain. Fold the paper in half and cut out a circle on one side.

3. Now it remains to design the product. Find the right text or write your own by hand.

4. Glue the congratulations inside the card.


6. And the front side will look like this. It's like a ship is floating on the waves.

I also saw such a handsome boy yesterday, I suggest you build it too.
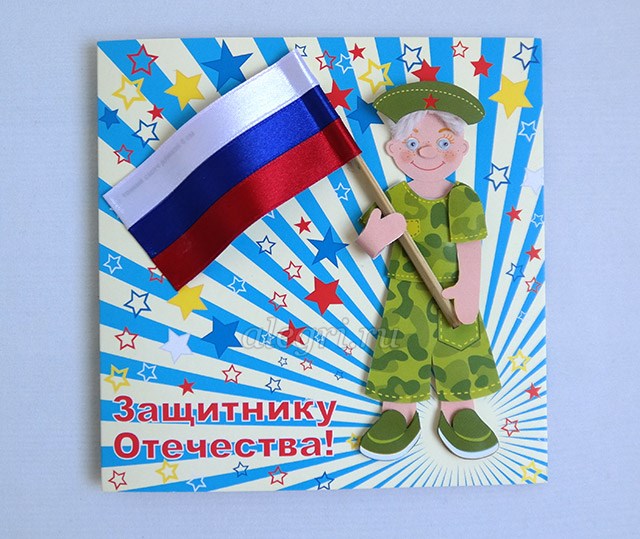
To create such a charm, cut the blanks with scissors.

Glue everything you have in mind on the background you want. The flag can be made from satin ribbons and a match, or use a cotton pad instead of a stick.

If you want a masterpiece in general, take a look here, a stylish and very cool idea for children of any age.

We make postcards with children in kindergarten from paper for dad and grandfather
An excellent option would be a rather unpretentious postcard with the image of a bear cub in military uniform. You need to make such a background on a piece of paper using a printer.

Cut out the stencils according to the pattern.

Then glue them to the background.

And on the back, write or print a congratulation.

Well, I also found such a simple idea for very small young talents.
We will need:
- multi-colored cardboard with embossing
- colored paper
- scissors
- ruler
Stages of work:
1. Print the stars on an A4 sheet, or make stencils, and then draw them on colored paper and cut them out.

2. Fold the embossed cardstock in half. Cut out two strips of colored paper and glue them overlapping. Also decorate with a star.

3. Such a very beautiful and cute result, write wishes on the other side.

Unusual gift in the style of quilling Tank
It will be really cool if you make a postcard and, in addition to everything, present a small souvenir in the form of

Those who are familiar with this technique will easily create any plot).

And for those who are not familiar yet, I found a video for you from which you will learn how to do this:
You can deviate from the topic and make it out of numbers, but in the same style.

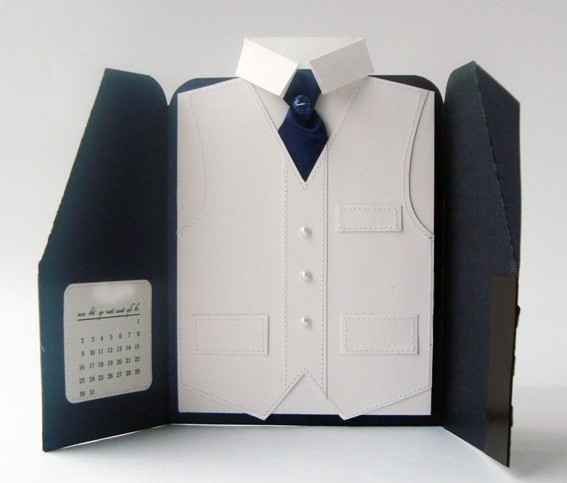
Master class on how to make a shirt with a jacket
by the most easy option can become a souvenir in the origami technique, colored double-sided paper or A4 white sheet is used.

It turned out a small shirt with a tie.

In addition to everything, since this is a postcard, you will need to come up with a poem or congratulation and read it with expression.
Or you can go another way to make a blue or light blue sheet tie first, and decorate it with all sorts of stickers, sequins, rhinestones, etc.

And then glue it and you get the easiest gift option.

And if you want to do something more serious, then use this instruction.

It is necessary, as shown in the figure, to make a product layout.
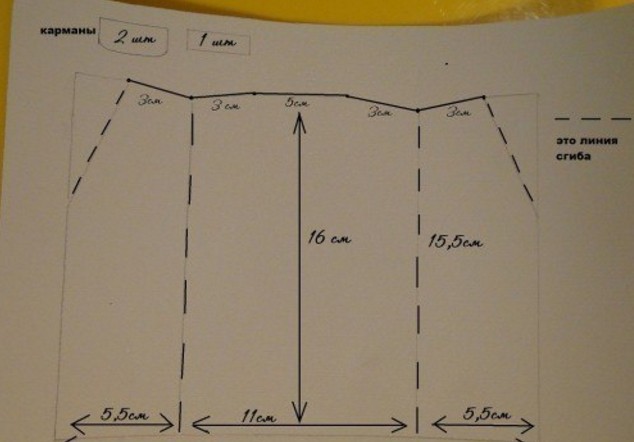
Then use the ruler to collapse along these lines. Of course, draw the lines with a pencil, not a felt-tip pen, a felt-tip pen is shown here so that you can see it better.

This is how the jacket looks like.

It remains to make a collar, make it according to the scheme.

Then cut and roll.

Finish by gluing on the right touches for completeness, this is a satin ribbon or paper tie and a poem.

You can also make a postcard with a little secret.

Take a piece of paper and make these marks as shown.

Plus there will be a vest.

The result can turn out for you, the main thing is to try to do this work with great love, and then, what could be more pleasant to give to grandfather or dad on the long-awaited day.

If you want to be original, you can put a bill or something else more impressive.

You can even stick a calendar.
We create a three-dimensional postcard with children for the holiday of Defenders of the Fatherland
Such products are usually in great demand because they look spectacular and beautiful.

See how cool they designed a regular photo frame. Make a boat or steamer first.

A diagram of such a craft is presented here.

You can use another option, like this, you have to stick the desired images on a piece of paper.
And then color it with paints or felt-tip pens. Blanks can be downloaded and printed.

 By this principle, you can do other work.


Every boy or guy does not dream of a good set of tools, right? So let's give him a dream.

For the next work, you will need 2 pieces of paper. different colors, a pencil, a glue stick and a clerical knife, because the protrusion style will be applied.

It will turn out very stylish and tasteful.

You need to print the template on the printer, request it from me. And then connect the white base and blue images.

From corrugated paper or thick cardboard, carefully cut out the stars, 3-4 pieces and glue on the base.

That's all dear friends and subscribers. If you were interested, share this note on social networks or leave your feedback on this post. Good luck to all! And our defenders of good health, success in everything! Bye everyone!
Sincerely, Ekaterina Mantsurova
”, made in the scrapbooking technique. This mini album, "dressed" in a fashionable "shirt", the author - Alexandra Orlova - made for her husband as a gift for February 23.
Master class by Alexandra Orlova:
I want to offer you one of the options on how to congratulate men on February 23, and show how I did it :)
I decided that it would be a mini-album containing a spiritual verse, a photo of my husband and a gift. To begin with, I made a blank from designer cardboard according to the template (dotted line - the place of the fold):

Pasted neatly in the middle of the smaller part into the larger one:

I prepared the leaves: I cut the necessary paper 10 * 15 cm in size and printed out a poem on it, found on the Internet (I formatted it myself with fonts).
The following images are in PNG format, which means they have a transparent base. You can save them on your computer and print them on any background.


After printing, cut the leaves in half. I chose 2 photos of my husband. She also printed out the inscription “From February 23!” and a note with a hint where the gift is located (I have tickets for the concert of my favorite artist :)) - for the tag.


In the photo you can already see the finished cover. I'll tell you how I made it =) To begin with, I decided that it would be in the shape of a shirt, so I found a suitable template on the Internet and printed it in the required size so that it covered the cover completely (I had to cut it a little in length):

I cut out the template, chose the paper, circled it with a pencil.

After that, I cut out large parts and glued the necessary. I left the pocket on a larger piece (so that I had something to hold on to), as I planned to subsequently flash it on a typewriter.

I stitched the details on a sewing machine:

I glued and decorated the front part of the “shirt” with brads-buttons.

In conclusion, I pasted the halves of the “shirt” onto the cover:

mini album as a gift to her husband is ready!
Thank you all for your attention!
Friends, support the contestants with your comments and "likes" in social networks! All their works are now presented in the menu section "Competitions". Go, get acquainted, share your impressions. I hope the ideas that the contestants share will help you get inspired in preparation for the upcoming holidays =)
Have a great mood!
See you soon at KARTONKINO.ru !

Hello everyone!! Not far off is the men's holiday on February 23. And we have already begun to prepare for it with you. So, we sorted out which original ones can be prepared on this day, and also considered gift options in the form of. Today I want to continue the theme of needlework and see what cards can be made for our dads, grandfathers and brothers.
Of course, most often, our children delight their dads with original souvenirs, so I will have a selection for children of different ages, both for kids and older. It will be useful for adults to read and choose what they can do together with the children.
It's no secret that all postcards are made of paper and cardboard, using different techniques, and they also add materials such as napkins, sparkles, and inscriptions. The result is very good crafts that will please anyone.
Let's take it in order. And to begin with, consider creative works made of paper, white and color))

In most cases, the work is done in the form of an application. For children of younger preschool age, it is necessary to make blanks in advance, which they then, under the guidance of an adult, simply glue. Or, if the guys know how to use scissors, give them a little cut.
See what work can be done here. Decorate the front side with a thematic picture, but on the wrong side, glue a poem or sign a wish with your child.
- A simple application with a boat. Cut out the details and pasted on a colored background.

- A slightly different version with seagulls.

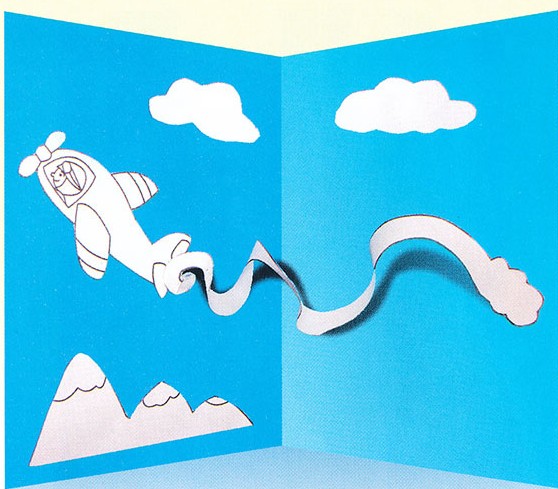
- Prepare planes in advance. Then it remains to glue them together with clouds of equal paper.

- In this form, use cardboard as a base.

- Here, cut out the symbolism from colored paper and carefully stick it on the base.

- Here is a crepe paper helicopter or you can use felt. It also looks very impressive.

- See what funny bottles with a surprise. A wave is easy to make from curly scissors.

- More airplanes, only for bulk crafts, clouds can be made from cotton wool.

- The option is more complicated using the quilling technique and torn paper appliqué.

- And here, print out the background with clouds in advance, stick it on cardboard and first glue a two-color ball on top, then a plain one, but only the middle, wrap the edges.

- You can also include not only gluing, but also drawing.

Well, let's show you how you can make the most popular type of craft for Defender of the Fatherland Day.
We will need: a sheet of cardboard, colored paper, PVA glue, felt-tip pens and paints.

Manufacturing process:
1. First color the template and cut it out. When cutting clouds, keep in mind that one cloud must be cut with scissors in a spiral to the middle (2).
2. Fold a piece of cardboard in half and open it again.

3. So, on the right side of the base, glue a spiral cloud, and after applying glue to the wrong side of a small cloud, close the card and hold it for a while so that the spiral sticks to both sides of the card (4).
4. Open the product. The plane must be glued so that the tail is 1 cm higher than the glued middle of the spiral cloud. Decorate the background as you wish or according to the template.

5. Fold the craft and unfold it again. Everything is ready!!
Like you can make a gift, only with a typewriter inside. Save and print templates!! I think everything is clear how to make such a product.


We make postcards from colored paper and cardboard at school
- Volumetric postcard with a tank, a rocket and a star. I have already described in detail how to make such a product in an article about. So if you are interested, you can read.

- But such an interesting emblem, it is better to make a star convex.

- Do not forget about the marine theme with bulging sails or waves.


- By the way, it’s very cool to make military equipment using the origami technique and stick it on the base. For example, you can fold a regular or two-pipe.


- But look what a spotted plane made of equal paper rises on a glued base-a cloud of cardboard.

- Well, a beautiful boat with scarlet sails. It is very easy to do: cut the waves in a wave, glue the boat in strips on top of each other, and twist the sails and glue only the edges.

I also found an excellent folding option with wishes inside. Here I share with you the video, everything is told in detail and shown. I really liked the idea, such a bright and unusual congratulation is obtained.
Step-by-step process of making a gift for dad from daughter
And it’s over, all dads who have daughters expect special crafts made by their own hands from their princesses.
If you have a daughter, then I suggest that she show the idea of making such an interesting voluminous postcard, which I found on one site, you will actually see its name on the templates below.

We will need: printed templates, glue or thin double-sided tape, voluminous tape, red, blue and white ribbons, eyes for toys, white yarn, scissors.
Manufacturing process:
1. First, print out the background and cut out the templates. Depending on the gender, we cut out either a skirt or pants.


2. Tape the shoes and pants to the boy.

3. Stick on the T-shirt and tuck your hand into the slot.

4. Make hair out of yarn and glue it on your forehead.


6. Glue the stars on a bulky double-sided tape and write a wish inside.


I think any child will like to make such a product, and dad will be pleased to receive it. do you agree with me??
How to make a postcard for February 23 from napkins
And if you have accumulated a lot of bright, multi-colored or plain napkins, then this is very useful. Now I'll show you what you can do with them.
First, think over the plot, and then tear the napkins into small pieces and twist, glue them onto the base of the invented product.
- That's what tanks you can create !!

- The background can be painted with paints, it will turn out even brighter.


- Here's the parachute option.

- Or a traditional airplane.

- Or a boat.

Such work is done very easily and simply, and also quickly. So get creative with the kids!! Enjoy great pleasure!!
Postcard in quilling technique "Tank"
And the next option is a win-win, as it is done in just 10 minutes. And you will need a minimum of materials. But the craft, as always, will be incomparable and on topic !!

We will need: colored cardboard, white and colored paper, glue, toothpick, curly scissors or a stapler.
Manufacturing process:
1. Take colored cardboard and fold it in half.

2. These are the blanks you should get.

3. Print out the inscription and cut it out. Also cut out a rectangle from white paper, slightly smaller than cardboard. Decorate the edges with curly scissors or a stapler. Glue on the front side.

4. Take green paper or special quilling paper. We need 7 stripes. Two wheels from one strip, two wheels from two glued. Spin the wheels.

5. Glue the finished wheels together, and wrap around the perimeter with a strip and secure.

6. For the cab, glue three strips and twist into an oval, glue the tracks on top.

7. Twist the "eye" out of dark green paper and glue it too.

8. At the toothpick, cut off one sharp edge and wrap it with a thin strip of green, fixing it with glue at the end.

9. Connect the cannon to the tank.

10. Glue the tank on a white base, and inside you can sign or stick a congratulation as usual.

Here is what beauty can still be made using this technique:


I just wanted to create such wonderful works with my daughter !!
Master class on making postcards for February 23 for kindergarten and elementary school
Now I offer two more amazing gifts to choose from. The first, unusual and strict, and the second - with a military theme.
Well, are you ready for needlework?! Then let's go!!
- Shirt with a bow

We will need: A4 color cardboard, pastel colored paper, bright colored paper, bow pasta, gouache, thin and thick brushes, glue stick + PVA glue.
Manufacturing process:
1. Take the pasta and decorate it with a thin brush. Let them dry well.

2. Cut out a 10 x 9 rectangle from colored paper. Fold it in half to make a 5 x 9 rectangle.

3. At one end of the rectangle draw a line 1.5 cm from the edge, and on the other side draw another line 3.5 cm from the fold. You should end up with a small rectangle. Cut it off.


4. Extend the cut by 1 cm. Expand the sheet and fold the collar of the shirt along the finished lines.

5. Bend the shirt again, draw the sleeves and cut out. Expand the workpiece.


6. Now assemble our product. Take the cardboard and fold it in half, glue colored paper on it. Next, glue on the shirt and bow tie. Glue the remaining pasta as a decoration next to it. Your masterpiece is ready.

By the way, you can also draw buttons and a pocket with a thin brush, for example.
- ship
We will need: colored paper, colored cardboard, a simple pencil, regular and manicure scissors, a ruler, glue - a pencil, compasses or round objects.
Manufacturing process:
1. Take the cardboard, fold it in half. On the front side, use a compass to draw a circle and carefully cut it out.


2. Draw a boat on brown cardboard and cut it out.

3. Now draw waves on white and blue paper, cut it out too.

4. Take the cardboard and cut out a triangle from it. It is desirable that the cardboard be double-sided, if you have a regular one, then cover the non-colored side with colored paper.

5. Stick everything on a cardboard base, but glue the triangle on one side and bend the other. You can complement the composition with clouds or seagulls.

I wonder which postcard you choose?! Write if it's not difficult!!
Video on how to make a postcard for February 23 using scrapbooking technology
Are you familiar with the scrapbooking technique? To be honest, I met her recently. It turns out that this is a very amazing and simple technique, and what souvenirs you get out of it)) I suggest you see everything with your own eyes, I think you will certainly want to repeat everything.
In fact, there are a lot of varieties of such postcards, hammer in the search and see everything for yourself. If there is no time, then I suggest ideas that I liked.
- Typewriter with a letter

- Star variant

- Numbers and military equipment


- Such a calendar, you can also make it in the form of a magnet

Agree that the products look like a store, it looks very nice.
Funny postcards for Defender of the Fatherland Day with your own hands
Well, in the end, a small photo selection for men who are not devoid of a sense of humor. Yes, children need to diversify creativity))
- Fashion shirt or sportsman

- You can use comic characters

- Ideas with photos


- And I really liked this composition, so gentle and romantic. Great gift idea from wife for her sailor

I hope I've been helpful and interesting. I wish you all positive, love and miracles!! And be sure to write in the comments if your kids make such gifts ?! Or give the choice to purchased souvenirs?! I still think that it is useful for children to make products themselves and surprise their parents.
We present to your attention original postcards in the cutting technique for February 23. Such postcards can also be presented for other holidays by changing the inscription, for example, to “Navy Day”, “Air Force Day”. And also you can think over the initial design yourself, changing it to a hobby or a dream, then this idea will come in handy not only for a military holiday.
In order to create a postcard by February 23, you will need:
For the base of the postcard - colored pastel paper;
For liners - office paper;
Stationery / dummy knife;
Glue,
For tinting the edges - a stamp pad / acrylic paints + a brush (hard);
Creasing tool.
1. At the end are the templates that you will need to print. Cut out, crease along the fold line and bend the base of the postcard.

2. Cut out a rectangle from office paper slightly smaller than the folded postcard (reduce the width and length of the postcard by 5 mm - the appropriate size for the inscription (congratulatory)). Decorate it with stamps, a corner punch, etc. Glue to the base of the postcard.

3. Prepare another insert for the card - a lining between the front side of the greeting card and the part with the greeting text. This part is scored at a distance of 2-3 mm from the edges along the longer side, and a fold is prepared. After that, you need to apply glue to this small lapel, and glue the sheet along the fold lines of the base of the postcard.
4. Tint the edges of the postcard (in this case, silver acrylic paint was used for one postcard, and a “golden” ink pad was used for the other).

5. Prepare lettering for the postcard. Why in a text document you need to make the inscription "February 23", set two spaces between the letters. Choose a font, set the appropriate size for the letters.
Cut out each letter separately in a “square”, tint the edges and put them on pastel paper (on the base of the postcard). Cut again, leaving a small allowance. And stick it again - now on the paper used to line the inside of the postcard.

6. Arrange the letters on the front of the card as you wish and stick each detail onto the foam tape. You can do this in a chaotic manner, as in the version of the postcard with airplanes (they used foam tape of different thicknesses), or in a line, as on a postcard with a helm and anchor.

A postcard by February 23, if desired, can be decorated with suitable elements - buttons, ribbons, pendants, etc.
Goal: learning how to create a men's postcard in the style of scrapbooking.
Educational:
To acquaint students with the concept of "scrapbooking", its main types and techniques;
To acquaint students with the features of creating men's postcards using this technique.
Correction-developing:
Develop concentration and switching attention through the implementation of sequentially assigned tasks and shift various kinds activities;
Develop spatial representations through the manufacture of elements located symmetrically on the right and left sides, as well as through the execution of tasks at the top, bottom and inside the postcard;
Development of abstract logical thinking and design abilities through the manufacture of three-dimensional elements.
Educational:
Develop a sense of color, composition and style;
Contribute to the aesthetic education of students.
Materials used:
Kraft paper, density 200g/m;
scrap paper;
Corrugated cardboard;
Texture acrylic paste;
Metal pendant;
Paper cutting in the form of stars, a balloon, numbers 2.3;
Tools:
Simple pencil;
Palette knife;
Creasing stick;
Stencil in the form of brickwork;
The master class is designed for two sessions lasting 45 minutes each.
Course progress.
I.Organization of the beginning of the lesson.
Purpose: to prepare students for work.
II.Messaging the topic and purpose of the lesson.
Purpose: to inform the students about the topic of the lesson, set a goal for them.
Today, at the lesson, the topic of which is “Master class“ Postcard for February 23 in the style of scrapbooking ”, we will talk about the scrapbooking style, get acquainted with the main styles and techniques of this type of creativity, and make a postcard by February 23.
III. Presentation of new material.
Purpose: to present the content of the material based on the knowledge of the students.
The word scrapbooking comes from the English words scrap - clipping, book - book, and literally means "a book of clippings." Scrapbooking is a kind of handicraft art that consists in the manufacture and design of family or personal photo albums.
This type of creativity is a way of storing personal and family history in the form of photographs, newspaper clippings, drawings, records and other memorabilia, using a peculiar way of preserving and communicating individual stories using special visual and tactile techniques instead of the usual story. The main idea of scrapbooking is to preserve photos and other memorabilia of any events for a long time for future generations.
It should be noted that scrapbooking is not limited to the creation of classic albums - in the collections of scrapbooking masters there are also accordion albums (leporello), albums in the form of houses, albums in the form of boxes / baskets, and even individual postcards (the so-called cardmaking, from the English. Cardmaking - making postcards). There is also the so-called "digital scrapbooking", which uses various computer applications to design and decorate photographs. Using standard tools, applications create the appearance of a separate page or an entire photo album, which can then be output to a printing device, or saved as files in graphic formats.
There are several “basic” scrapbooking techniques:
Distressing (English distress - disaster). One of the most popular techniques with which pages age. Options for using this technique: creating a torn edge, using distress inks, craquelure, toning, aging paper, creating scuffs, scratches, and so on.
Embossing (literal meaning - to extrude a convex pattern). This technique has two varieties: the embossing method (created by extruding a design through a stencil onto paper, foil or a thin sheet of metal) and wet embossing (obtained by heating and melting a special powder).
Stamping allows you to create effects with the help of ink and stamps, as well as various applicators, limited only by the imagination of the scrapbooker.
Many craftsmen sew their scrap pages on a sewing machine, and various stitches already play a decorative role, or add fabric to the work, or even make a page out of fabric and sew a photo on it. Other artistic techniques are also used, such as embroidery, quilling, pop-up, decoupage, iris folding (rainbow folding), origami and other handicraft techniques.
The following basic styles used in scrapbooking can be distinguished:
Vintage (False old style). This style is characterized by the use of old photographs or pictures from aged elements, as well as any "historical" items: old postcards, stamps, jewelry.
Heritage (Heritage). Used for decorating old photographs. A characteristic feature is the use of color schemes characteristic of those periods from which the photographs are borrowed.
European style. The main sign is rigor and restraint. Usually they are distinguished by a single principle and plot of photographs and a minimum of decorations. A distinctive feature is a significant (usually more than three) number of photos on one page.
The American style is classic in scrapbooking, its main difference is a large number of various decorations, which, nevertheless, is balanced for the current page, does not dominate the photo.
Shabby chic (shabby chic). Also known as "false old", "false used" with elements of chic. The main difference from other styles is the use of falsely aged, with the effect of prolonged use, elements: ribbons with frayed edges, torn backgrounds, with various scuffs, crumpled. Moderate colors (pale pink, light green, pastel) are most often used as backgrounds.
Pure and Simple. A minimum of simple decorations is used. The main difference from other styles is the clarity of the lines, a simple graphic approach, a single font used. Usually a light uniform color is used as a background. Often, pages in this style look like an assembled puzzle - nothing more.
Mixed media. A mixture of styles, materials and different techniques. The most important and most difficult thing is not to overload the page with an abundance of styles, and also not to try to combine the incongruous.
Free style. The main features are a light background, bold color combinations, a heading and journaling made by hand using pencils or felt-tip pens.
IV. Physical education minute
V. Practical part
| Creating the base of the postcard: |
|
| From craft paper, cut out the base of the postcard 15x25 in size; with a creasing stick, lay a fold in the middle, fold |
|
| From scrapbook paper sheets, choose two that are combined with each other; From the first sheet, cut out details with dimensions of 14.8cm x12.3cm and 14.8cm x 4cm; From the second sheet, cut out a piece measuring 14.8 cm x 8.3 cm. |
|
| On the front side of the postcard, stick the details with dimensions of 14.8cm x8.3cm and 14.8cm x 4cm; Glue a piece measuring 14.8 cm x 12.3 cm onto the back of the postcard. |
|
| Decorating the front of the postcard |
|
| From different sheets of scrap paper, cut several rectangular pieces of free size; |
|
| Arrange the cut parts in an arbitrary, aesthetically pleasing order |
|
| Stick the cut parts on the front of the postcard, while shifting them with pieces of corrugated cardboard to give more volume. |
|
| Using a figured hole punch, cut out the "Steam Train" pattern from a piece of craft paper. |
|
| Take a cutting in the form of stars, numbers, a balloon; Cut out decorative elements from scrap paper (in our case, these are fragments of dials and an element with the inscription “Dreams give wings”); Trying to create a composition; Glue dials and locomotives between layers of paper, shifting the element with the inscription slightly to the right; Randomly tear off a piece of corrugated cardboard and stick it on a postcard, it will balance the “craft” steam locomotives; Do not glue the cutting yet, set aside. |
|
| Working with texture paste |
|
| Take texture paste, a brickwork stencil, a palette knife and a piece of sponge. With their help, we will decorate the areas where the balloon and stars will be located. |
|
| Attach the stencil to the selected area, apply the paste with a palette knife, remove excess paste with a sponge. Carefully remove the stencil, let the paste dry for a few minutes. Repeat the same steps on the other section of the card. |
|
| When the paint on the sponge dries a little, apply a small amount of it to the locomotives and corrugated cardboard |
|
| Once you're done with the paste, finish decorating the front of the card by adding a die cut. |
|
| Decor of the inside of the postcard |
|
| From a sheet of scrap paper, cut out two blanks measuring 25cm x 15cm; Fold in half. |
|
| Fold the workpiece folded in half diagonally, pay attention to where the fold is located. |
|
| Using a ruler, make marks every 2.5 cm. Using a creasing stick, draw lines along the marks. |
|
| Expand the workpiece, then fold along the diagonal lines so that the corner looks inward. |
|
| Fold each edge along the creasing lines alternating inward and outward. Repeat with the second piece. |
|
| We glue the blanks inside the postcard on both sides, combining the fold in the middle. |
|
| From another sheet of scrap paper, cut out 2 blanks measuring 12.5 cm x 6 cm, paste them into the postcard in the middle. |
|
| To decorate the inside of the card, tags cut out of scrap paper with the inscriptions “Dream”, “Fly” were used; clock faces, gears, airship. | |
| We decorate the upper part with dials. For a larger volume, we glue them with pieces of corrugated cardboard or foam tape. |
|
| Cut out 2 strips of 1.5 cm x 5 cm from kraft paper, make folds every centimeter, fold into squares, glue; Similarly, we cut out strips 1.5 cm x 2.5 cm, add them up after 0.5 cm. |
|
| Glue the resulting cubes to the base of the card. Glue one on the fold with two sides, the other (same in size) - a little higher, stick a tag to them, do the same with the second tag. |
|
| Glue the gear and the airship to the tags. |
|
| Hang a metal pendant on the twine, use an awl to make a puncture in the upper part of the folding elements, thread the twine into them, glue the outside. |
|


vI. Repetition of the studied material:
What is scrapbooking?
Translated from in English what does this word mean?
What techniques are used in scrapbooking?
What techniques did we use to make the postcard?
What styles of scrapbooking do you know?
What style do you think our postcard is made in?
VII. Summing up the lesson. Exhibition of postcards.
Used Books.
Ekaterina Belikova. What is a scrapbook?
Anastasia Tsygankova. Helpful information about types of albums
Elvira Gabdullina. Postcard with a particle
Shlyakhtina S. Unique do-it-yourself scrapbook style photo album. Computer-Press, No. 7 (2008).
Anastasia Tsygankova. 10 facts about scrapbooking.
Natalya Trofimova. Scrapbooking: everything is useful!


