How to make a cake for the New Year? You always want it to be not only tasty, but also beautiful, original and somehow related to the New Year theme.
Cake is a dish that is served as a dessert for tea after New Year's dinner.
Of course, you can offer a lush one instead, but cake is cake, and how can you do without it on this wonderful New Year’s Eve.
New Year's cake – roll “Berries on the snow”

Ingredients:
Biscuit:
- Eggs – 5 pcs.
- Sugar - (150+50gr.)
- Flour - 1 tbsp.
- Milk - 2 tbsp. l.
- Unscented vegetable oil - 4 tbsp. l.
- Vanillin
- Spray for mold
- Shape 28x43 cm
- Raspberries, blueberries, cherries, 50 - 60 g each.
- Coconut flakes – 30 – 40 gr.
Cream:
- Whipping cream with more than 30% fat content - 500 ml.
- Sugar - 2/3 tbsp.
- Cream - Philadelphia cheese (or similar) - 200 gr.
- Vanillin or vanilla sugar
Impregnation:
- Warm water – 50 – 60 ml.
- Sugar – 1.5 dessert spoons
- Liqueur – 1 dessert spoon
Preparation:

Separate the egg whites from the yolks, beat the yolks with a mixer and gradually add 150 grams of sugar, milk and butter in small portions
Add flour, vanillin and manually mix into the mixture with a spatula
Separately, beat the whites in a bowl, pour in 50 grams of sugar in small portions to form a fluffy foam.
In three additions, add the whipped whites to the yolk mixture and mix carefully

We cover the form with parchment paper, grease it with spray, or with simple odorless oil, pour the dough into it, level it over the entire surface
Place in the oven preheated to 170 degrees for 10 - 12 minutes
We put the resulting cake out of the mold, remove the paper, cover it with a towel and let it stand for 5 - 7 minutes so that it cools slightly and becomes limp.

While the roll is warm, using parchment paper removed after baking, roll it into a roll and set it aside to cool.
Prepare the cream by pouring the cream into a bowl, whipping it with a mixer, gradually adding sugar
Now separate the cream cheese, add 3-4 tablespoons of whipped cream and beat with a mixer until smooth.
Add the cheese to the cream and mix to form a smooth, thick cream.

Prepare the impregnation for the roll, mix water with sugar and liqueur

Unroll the roll, soak it with the prepared impregnation
After this, apply a layer of cream

Lay out the berries, if you had them frozen, you need to thaw them first, if canned, drain the juice and let them drain completely

Now carefully wrap the roll again, no need to squeeze it

Place the biscuit on a flat plate and carefully coat it with cream on all sides.

Sprinkle coconut on top

Arrange the berries on the surface in any shape

The top of this entire piece can be lightly sprinkled with powdered sugar.
Sponge cake Broken glass with jelly

We are preparing a very tasty, festive dessert, it is made from jelly. There are many cooking options, so I want to tell you in more detail the various methods, what can be replaced with and how it can be diversified

Ingredients:
- Colored jelly 80-100 gr. – 3 packs
- Sour cream 10 - 15% fat - 400 gr.
- Gelatin - 20 gr.
- Sugar – 100 – 150 gr.
- Vanillin
- Boiled water (for jelly)
- Kiwi – 3 pcs.
Biscuit:
- Eggs – 2 pcs.
- Flour - 80 gr.
- Sugar - 80 gr.
- Baking powder - 0.5 tsp.
Preparation:
As for jelly, you need to take different colors, for example, strawberry, lemon, orange, currant. You can also use fruits, kiwi was taken as an example, to obtain a green color, and you can also take regular gelatin, to which you add dye and juice for taste.
The more different colors, the more beautiful our product will be.
If adding fruit, use one - kiwi, peaches, pineapple or orange

First of all, we make the jelly. Each package contains instructions on how to do this correctly. The only deviation is to reduce the amount of hot water by half, that is, if the package says 200 grams of hot water, use 100 - 120 grams. no more
Let it cool and put it in the refrigerator to harden.
If you do not use ready-made jellies, but gelatin with juice, the amount of liquid should also be reduced by 2 times
Clean the kiwis and cut them into large cubes
Prepare the sour cream filling, dissolve the gelatin, the amount of water is 2 times less than according to the instructions
After the gelatin swells, heat it until it is completely dissolved, never bring it to a boil, leave it to cool
Place sour cream, sugar in a bowl and mix with a blender until the sugar is completely dissolved.

Then pour the cooled gelatin in a thin stream and mix until the entire mass of sour cream is homogeneous.
After the colored jelly has hardened, take it out of the refrigerator and lower the glass to the level of the jelly mass in hot water for a few seconds so that the mass lags behind the walls of the glass
Place on a board and cut randomly into pieces of different sizes and shapes.

Place all the jelly and pieces of fruit into a bowl, pour in the sour cream filling and mix gently

Pour the mixture into the mold, level it so that the pieces do not protrude above the level of the sour cream filling and place in the refrigerator until completely hardened.
After hardening, put the cake out of the mold onto a plate and the cake is ready, it can be served in this form, but it is better to cook it on a sponge cake
Prepare the sponge cake, to do this, beat the eggs into a bowl, pour in the sugar and beat with a mixer to get a good foam.
Add baking powder to the sifted flour, pour it into the eggs and knead the dough with a mixer at low speed.

Take a mold, its diameter should match the diameter of your jelly cake, cover the bottom with parchment paper and grease with vegetable oil
Place the dough in the mold, level the surface, place in the oven at 180 degrees for 30 minutes, monitor readiness and check with a simple wooden toothpick

Cool the finished sponge cake, take it out of the mold, soak it with impregnation, it can be sour cream with sugar, fruit or berry syrup, at your discretion, we just need to soften the sponge cake

Leave the biscuit for a while to soak, and at this time lower the cake pan into a large bowl of hot water so that the surface melts slightly

Carefully place the jelly dessert on the sponge cake
Trim the edges of the biscuit to size

It turned out beautiful, festive and very tasty, bon appetit.

It is made from small chocolate and pistachio cakes filled with the most delicate, delicious cream, flavored with ice cream.

Ingredients for a mold with a diameter of 22 cm:

Ball cakes:
- Rusks - 300 gr.
- Condensed milk - 4 - 5 tbsp. l.
- Butter - 50 gr.
- Soft cottage cheese - 100 gr.
- Milk - 4 tbsp. l.
- Cocoa - 2 tbsp. l.
- Unpeeled pistachios - 200 gr.
For cream:
- Eggs – 2 pcs.
- Milk - 400 ml.
- Corn starch - 2 tbsp. l. (or potato)
- Vanilla sugar - 1 sachet (10 g.)
- Condensed milk - 200 ml.
- Soft cottage cheese - 200 gr.
- Gelatin - 20 gr. + 100 ml. milk
Preparation:
First, let's prepare the balls from the "Potato" cake; for this, the most ordinary crackers without sprinkles and raisins need to be crushed in a food processor or grated on a fine grater

Add condensed milk, softened butter and soft cottage cheese to the prepared crumbs, you can use Activia, mix everything in a food processor

Divide the resulting mass into 2 parts, add cocoa to one, stir and set aside for now.

Add peeled pistachios to another part and grind everything again in a food processor.

You get such beautiful and already delicious ingredients for cakes

Add a little milk to each part so that the mass turns out to be a thick choux pastry and it is convenient to make balls from them.

Roll into balls that are approximately equal in size
Place the mold on a dish, grease it with odorless vegetable oil, and glue a strip of baking paper onto it to make it easier to separate the cake later.

Place the cakes tightly on the bottom of the pan, then put it in the refrigerator
We make the cream, pour gelatin into a bowl, pour milk into it, stir and leave to swell for the time indicated on the package
Make the custard, beat the eggs into a bowl, add vanilla sugar and cornstarch, start mixing
Pour milk in parts, stir until smooth, so that there are no lumps
Place the bowl over high heat; when the mixture warms up, steam starts coming out of it, reduce the heat to low and let the cream thicken well.
After the cream thickens, boil it for another 1 minute, stirring well all the time so that no lumps form, this will take you 10-15 minutes, but you need to focus on the thickness of the cream

Transfer the cream to a deep bowl, add milk gelatin, stir and beat with a mixer
Pour in the condensed milk, beat again until smooth, add the cottage cheese, and use a mixer to bring the cream until ready.
Transfer a few spoons of the finished cream into another bowl and put it in the refrigerator for 10 - 15 minutes, this part will be used to decorate the cake

Pour the cream into the mold and put it in the refrigerator

Place the thickened cream in a cooking syringe, or you can use a mayonnaise bag, cut off the bottom part, rinse it, it will be convenient to fill and use

Squeeze balls of cream over the surface of the cake, you can add cocoa to the cream or sprinkle with grated chocolate, put the cake in the refrigerator for at least 4 hours, or better yet, leave it there overnight

Carefully remove the mold, sprinkle with cocoa powder

This is such a beautiful, tasty and tender cake.
Video recipe for “Chocolate Truffle” cake
Original Chocolate Cake for New Year

Easy to prepare, takes very little time, you can prepare it in advance, this is a very juicy and delicious dessert

Necessary:
- Flour - 250 gr.
- Sugar - 300 gr.
- Soda - 1.5 tsp.
- Salt - 1 tsp.
- Cocoa - 55 gr.
- Eggs – 2 pcs.
- Butter - 60 gr.
- Olive oil - 60 gr.
- Milk - 260 ml.
- Vanilla extract - 2 tsp.
- Vinegar 6% - 1 tbsp. l.
Ganache:
- 1 part chocolate
- 1 part cream 30% fat
- 10% butter
To decorate the cake:
- Chocolate – 3 types, 1 bar of 90 g each.
Let's start cooking:

Mix all dry ingredients in a bowl - flour, sugar, soda, salt, cocoa

Add eggs, olive oil, butter, milk, vinegar and vanilla extract, if you don’t have extract, then you don’t need to add anything else

Mix it all with a mixer
We prepare the mold, cover the baking sheet with a baking mat, you can use paper, install a springform pan with a diameter of 18 - 20 cm. Grease it with vegetable oil, or line the inside with strips of paper
If you have a larger diameter mold, then you need to take more ingredients to make the cake tall.

Pour the dough into the mold, keep in mind that the dough will rise well during baking, so choose a mold with high edges
Place in the oven at 175 degrees for 50 - 60 minutes

The biscuit is ready, carefully remove the mold from it

Cut off the top of the biscuit with a knife, making a smooth surface.

The sponge cake can and should be made in advance, wrapped in cling film and placed in the refrigerator for a day

To prepare the ganache for such a cake you need approximately 90 grams of chocolate, 90 grams of cream and 18 grams of butter

Place the bowl in a water bath, or you can melt it in the microwave, setting the time for 15 seconds, then remove. Stir and set again for 15 seconds, in 4 – 5 steps you will get a ganache of the required consistency for applying it to the sponge cake

Gently spread the chocolate ganache onto the surface of the cake.

You can simply decorate the cake with walnuts, at home

This is how juicy it is, moist without additional impregnation.

Now let's try to make this cake especially attractive. First, let's make stencils of the nose, ears and muzzle on paper - this will be the dog's muzzle

Place white chocolate broken into small pieces into a baking bag. We put it in hot water to melt it, we do the same with milk and dark chocolate

Place baking paper on the stencil and apply chocolate according to the design

Place the prepared chocolate parts in the refrigerator

Spread frozen chocolate on top of ganache

This is a New Year's miracle
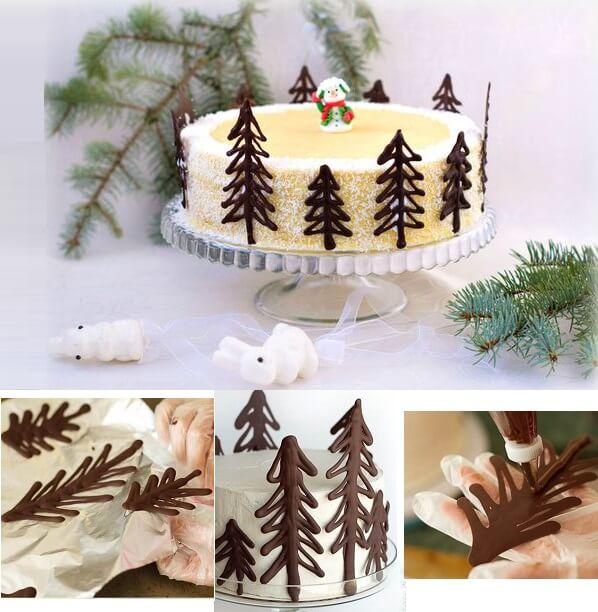
How to decorate a New Year's cake with your own hands

Every housewife, when preparing a cake for the New Year's table, tries to make it beautiful, original and a real decoration.

Here are some examples of simple decorating techniques you can do at home.

The cake itself can be made, for example, based on “Honey cake”

or just bake a sponge cake and soak it in syrup

All these decorations are not difficult to make; you can make them at home, adding a little imagination.
The New Year's mood is not only a Christmas tree, garlands, Santa Claus and the midnight congratulations of the President. First of all, this is a festive table. And its logical conclusion is a tea party with a delicious cake. And this despite the well-established opinion that “the holiday was a failure when it came to dessert.”
In fact, New Year's dessert is very important. And even if on New Year’s Eve the matter never came to him, then in the morning the cake will go off with a bang. However, it is not enough to prepare and serve a delicious dessert. It still needs to be decorated accordingly to maintain the charm of the magical holiday.


How to decorate a New Year's cake
So, it’s worth starting with the fact that the New Year is a special holiday. Any housewife runs around the shops for several days, prepares food, and on the eve of the celebration itself, practically the whole day does not leave the kitchen, constantly planing, chopping, boiling, frying and baking something.
Being in such time pressure, it is quite difficult to prepare everything. What can we say about dessert and especially about its decoration. That is why, if you decide to make the cake yourself, then its appearance should be thought out in advance, and the decorations should be as simple as possible.

What to make decorations for a New Year's cake from? There are no restrictions here. However, it is worth considering that on such a holiday there are quite a lot of fatty dishes on the table. Therefore, you should not make the elements of confectionery decor too greasy. So it is better to use buttercream to a minimum. Well, the most suitable materials for decorating a homemade cake are:
- ready-made decorations;
- fruits;
- powdered sugar and cocoa;
- chocolate and chocolate icing;
- caramel;
- meringue;
- confectionery mastic.
Each of these materials is worth talking about separately. Although in most cases it is best to combine several materials. But here it all depends on the imagination of the hostess, or rather on the design she comes up with for her confectionery product.

How to decorate a cake for New Year and Christmas
You can decorate a New Year's cake in different ways. The main thing is to think through the “design” in advance. There simply won’t be time for this on New Year’s Day. Inexperienced confectioners should generally practice preparing materials for decoration in advance. This will save a lot of time on December 31st.
To simplify the task, it makes sense not to worry about decorating the sides. If necessary, it will be quite enough to coat them with a small amount of cream mixed with cookie crumbs or crushed nuts.

But it’s time to return to a more detailed description of materials for decorating the top of homemade New Year’s cakes.
Finished decorations
This is perhaps the easiest way to decorate a dessert. Almost every city now has a store where you can buy a wide variety of sugar or chocolate figurines for decorating cakes and pastries.
Of course, just buying figurines is not enough. First, you will have to think through the composition in order to select the necessary elements. In addition, you need to prepare the surface of the future confectionery masterpiece by making a background for the future composition. These can be cocoa, powdered sugar or glaze.

Fruits
Decorating a New Year's cake with fresh fruit also does not require special skills or much effort. As a last resort, they can simply be spread on the surface of the confectionery product coated with cream. But it’s better to use your imagination and build something more interesting, for example: post an inscription or make stylized Christmas tree or snowman figures from fruit pieces.
The best options for decoration are strawberries, bananas, currants, grapes, kiwi and pineapple. But you can also use other members of the fruit family. The main thing is that their taste is combined with the taste of the product itself.


Powdered sugar and cocoa
This option for decorating a New Year's cake will already require some artistic skills and diligence. But at the same time, it is perfect for novice confectioners, since it does not involve the use of special tools or the preparation of any additional materials.
To decorate a cake using cocoa or powdered sugar, just cut out a stencil of the desired design from paper in advance, place it on the surface of the cake and sprinkle generously with the above-mentioned materials. Then the stencil is carefully removed, and the intended design remains on the surface of the cake.
It’s worth warning right away: it’s best to sprinkle your confectionery product using a strainer. Thanks to this device, powdered materials will lie evenly on the surface of the cake.
What exactly to sprinkle with? It all depends on the color of the main background. If the surface of the cake is covered with light cream, then it is better to make the design from cocoa, and on chocolate glaze and just a dark cake layer, white sprinkles will look brighter. You can combine these elements, for example: sprinkle the entire cake with cocoa powder, and make a pattern of powdered sugar on top.
By the way, the stencil does not have to be made of paper. Very beautiful designs are obtained when using lace napkins. The only downside here is that it will be almost impossible to wash the lace later.


Chocolate and chocolate icing
Decorating a cake with chocolate will never go out of style. Even a simple filling with chocolate glaze looks quite presentable. Moreover, even the most inexperienced housewife can cook it. To do this you need to take:
- chocolate (without additives) – 100 g;
- milk – 75 ml (5 tablespoons).
The chocolate should be broken into pieces, placed in a heat-resistant bowl greased with butter, poured with milk and placed in a water bath. The mixture must be constantly stirred. The glaze is ready when the chocolate is completely melted. The optimal “bath” temperature is 40°C.
White glaze is made in almost the same way:
- white chocolate – 100 g;
- powdered sugar – 100 g;
- milk – 30-50 ml (2-3 tablespoons).
Break the chocolate into a bowl greased with butter, add powdered sugar and half the specified volume of milk. Place the bowl in a water bath. Stir the mixture constantly until the chocolate is completely melted. Remove from heat, pour in the remaining milk and whisk everything well. By the way, if you add food coloring to this glaze, you can make it not only white.

Both of these frosting options are great for filling the top of a cake. And then you can do whatever you want: sprinkle with powder or cocoa, install ready-made figures, or make decorations from fresh fruit.
But you can do it differently by decorating the cake with figures or inscriptions made from the chocolate itself. It's not difficult to do this. However, for this you will need an additional tool - a pastry bag or syringe.
To make such a decoration, you first also need to prepare stencils or molds. The stencil can be cut out of foil. Everything else is simple. The chocolate is melted in a water bath, poured into a pastry bag or syringe and squeezed out on a flat surface covered with parchment along the contour of the future decoration. The parchment is then carefully placed in the refrigerator. After complete hardening, you can decorate the cake with figures or decorative elements. It’s even easier with a mold (cliché). The melted mass is poured into it and sent to the refrigerator.
This method can be used to make almost any decoration, from simple borders, Christmas trees or snowflakes to complex chocolate compositions. The only caveat is that chocolate figures need to be placed evenly on the cake so that when cutting it into pieces, everyone gets a little chocolate delicacy.

Caramel
Excellent decorations are made from ordinary sugar syrup, i.e. from caramel. To prepare it you will need:
- sugar – 200 g;
- water – 150 ml;
- vinegar essence – 5 drops (you can use a solution of citric acid – 10 drops).
Mix sugar with water and put on low heat. The mixture must be stirred constantly so that the sugar is completely dissolved. As soon as this happens, add vinegar essence or citric acid to the solution and continue cooking until thickened, constantly stirring the mass with a spoon.

To make figurines or decorative elements from caramel you will need a cliche. You can cut it inside half a potato. The resulting form should be dipped into hot caramel and placed on a cold plate greased with vegetable oil. The caramel will stick to the plate while maintaining its desired shape. In the meantime, until it has completely frozen, you can modify the figure a little: bend it or add texture.

Meringue
Without much effort, you can decorate the cake with meringue. But first you need to prepare the mass itself. To do this you need to take:
- eggs – 5 pcs. (only proteins are needed);
- sugar – 250 g.
Beat the egg whites until a stable foam forms. Then gradually – 1-2 tablespoons at a time – add sugar, continuing to beat thoroughly. When all the sugar has been beaten into the mass, you need to continue whisking it for at least another 15 minutes to form a fairly dense structure.
The base for the meringue is ready. Then everything depends on the design you come up with. You can bake a lot of small bezels to decorate the cake evenly or to lay out a design or inscription. You can also make several large “cakes” by giving the protein-sugar mass, for example, the outline of a castle with turrets before baking.
Bake the meringue at a temperature of about 100°C, on a baking sheet lined with parchment. You can spread the mixture onto it using either a pastry bag or a regular spoon.

Confectionery mastic
Well, you can do whatever you want with this material. There is plenty of room for your imagination to run wild. With the help of mastic, any cake can be turned into a real confectionery masterpiece. True, to prepare sweet mastic and work with it, you need to have certain skills, both culinary and artistic. Therefore, before making a final decision in favor of this type of decor, it makes sense to practice.

There are many recipes for making confectionery mastic. However, for home use, the dairy version of this material is best suited. The point is that it is universal. It can be used to cover the entire cake (covering), and for sculpting various figures and decorative elements.

You can prepare this mastic from the following products:
- milk powder – 180 g;
- condensed milk – 180 g (1 can);
- powdered sugar – 180 g;
- lemon juice – 1 tablespoon.
In a deep bowl, mix the milk powder and powdered sugar well. Add lemon juice there and mix everything thoroughly again. Then you need to add condensed milk to the mixture. This should be done in several stages, each time thoroughly mixing the resulting mass. At first you can mix with a spoon, then you will have to knead the mastic with your hands, like dough. By the way, so that the sweet mass does not stick too much to your hands, you can grease them with a small amount of vegetable oil or powder them with starch.
The result should be a homogeneous, slightly yellowish, dough-like mass, which should be wrapped in cling film and placed in the refrigerator for half an hour. After this you can work with mastic.

To give the mastic a different color, you need to add some kind of dye to it during the kneading process. We are, of course, talking about natural dyes. As such, you can use vegetable and fruit juices.
To cover the cake, the mastic must be rolled out and carefully applied to the leveled surface of the cake. After this, cut off the excess pieces of material. To make the mastic roll out better, you need to do this on a surface sprinkled with starch.
There is no need to throw away the cut pieces. The mastic can be re-rolled and some additional decorative elements can be cut out. Or you can make several “sausages” and braid them, getting an original border along the entire border of the cake.
As for the figures, everything is quite simple. The structure of the mastic is very similar to plasticine, and you can work with it in the same way. But in order to glue together two or three fragments of multi-colored mastic, you need to lubricate the glued pieces with water using a regular brush.

New Year's cake design theme
As has been mentioned several times above, the design option for a New Year’s cake needs to be thought out in advance. Of course, the most acceptable theme is a variety of New Year's symbols.
The simplest option is to decorate the cake with Christmas trees, snowflakes, or make it in the shape of a clock whose hands are approaching midnight. But you can also dream up.

A fir branch decorated with two or three balls will look beautiful on the surface of a New Year's cake. You can make such a decoration either monochrome - using powdered sugar or cocoa, or colored, using multi-colored glaze or mastic.
In a similar way, you can turn the surface of the cake into a real painting. A snow-covered rowan branch with bullfinches sitting on it will look bright and festive. The materials are still the same - glaze and mastic, but to create a bunch of rowan berries you can use real currants.
Do you want to decorate your cake with three-dimensional figures? No problem. Even an inexperienced “sculptor” can make a whole family of snowmen or something like penguins out of mastic. If you place them among Christmas trees made of chocolate or mastic, you will get an excellent New Year's story. Well, cooks with a clear inclination towards artistic art can create more complex figures, for example: polar bears from cartoons or a whole zoo of animals sliding down an ice slide.

A cake whose surface is presented in the form of an ice-covered pond (bluish glaze) on which funny characters, again made of chocolate or mastic, ride will also be interesting. The edges of the cake can be made in the form of snowdrifts made of whipped cream or cream.
Don't forget that the cake doesn't have to be round or square. A dessert in the shape of a Christmas tree will look great on the table. In this case, the upper part can be laid out from pieces of kiwi, dusting the “branches” with powdered sugar or spreading cream snow on them.
You can use other forms: a bottle of champagne, a bag of gifts, a cornucopia, and finally, just a Christmas ball. Fantasy is not limited here. So, go for it!
Happy New Year and... bon appetit!

Video “Decorating New Year's Cake”
Happy Friday, friends! Thank you for visiting me for another recipe, I hope it will go to the collection of your favorite desserts)
For several days my thoughts were busy racing information in my head in order to come up with a recipe for the New Year's table. First, a picture arose that the cake should be made of chocolate cake layers, and the cream must be white, all that remains is to come up with cake layers that would not be too thin and not too thick and choose a cream that would be loved by everyone, because the New Year's treat should be not “for everyone,” as they say. Everyone should be happy with the sweet treat, even if it’s their turn on the second or third day))
In general, I am against poor women standing at the stove all December 31, trying to prepare dishes that could fill the entire table. Paying such attention to food, you see, is complete stupidity. Spend better time with your loved ones, meet with friends or take a walk around the New Year's city, fly to another country, call someone you haven't called for a long time, create a miracle for someone, make someone's dream come true, watch the irony of fate for the hundredth time, in the end after all, but just don’t spend the last hours of this year cooking))
I tried to come up with a recipe that shouldn’t have any mistakes, that won’t take much time, and whose taste will appeal to many. What is important is that the cake is stored in the refrigerator for 5 days and only becomes tastier, so it will definitely get its turn)
Ingredients
Cakes:
- flour - 360 g
- butter - 200 g
- powdered sugar - 170 g
- dark chocolate - 100 g
- cocoa - 45 g
- refined vegetable oil - 30 ml
- egg yolks - 3 pcs
- baking powder - 1.5 tsp
- salt - 0.5 tsp
Cream:
- mascarpone – 300 g
- condensed milk - 300 g
- vanilla extract
Glaze:
- Dark chocolate – 100 g
Preparation
- Melt the chocolate and stir in butter at room temperature, put it in the refrigerator until the mixture thickens.
- Mix flour with cocoa, powdered sugar, salt and baking powder, you can mix everything with a whisk until the mixture is homogeneous. Add egg yolks and vegetable oil to the dry ingredients (choose odorless and good quality oil, if not, replace it with water).
- Then add chocolate butter to the mixture and knead the dough. The dough should have a pleasant consistency that will not stick to your hands; if you cannot achieve a similar consistency as in the photo, add flour or water if necessary.
- Divide the resulting dough into 5-6 parts and pack each part in cling film (I ran out of film at this stage, so I wrapped the dough in foil). Place the dough in the refrigerator for an hour.
- Prepare 5-6 sheets of baking paper, heat the oven to 180C.
- Now we take one piece of dough out of the refrigerator, roll it out directly on a paper sheet, about 0.5 cm thick and about 17 cm in diameter, and cut out a circle from the dough; you can use a plate or rings for the stencil. We put the scraps aside and knead another piece of dough from them, from which we can cut out stars for decoration.
- Roll out all the pieces of dough in this way and place everything directly on paper sheets in the refrigerator for half an hour.
- Then we take out one at a time, place it on a baking sheet and bake each cake for 15 minutes. And most importantly, the finished cake will be fragile until it cools, so you need to cool it without removing it from the baking paper.
- When the finished cakes have cooled, you can safely remove them from the paper and stack them for assembly.
- I chose the cream that is the easiest to prepare, but delicious, it goes well with the taste of the cakes. You need to beat the mascarpone until fluffy and gradually pour in, while whisking, condensed milk and vanilla extract. (The cream will be too liquid if you have chosen low-quality products, so try to buy all the ingredients of good quality. Recently, the quality of Belarusian mascorpone has become much better; if before it tasted more like curd cheese, now it is decent a product that I can recommend. Well, try not to buy cheap condensed milk, you need to read the composition and make sure that the can says “whole condensed milk with sugar.” Well, since we’re talking about products, I’ll note that the taste natural vanilla and natural vanilla extract have nothing in common with the one sold in the culinary departments with the label “vanilla sugar.” So try to look for natural vanilla beans and natural extract, you will understand that it is worth it).
- When the cream is ready, part of it needs to be transferred to a pastry bag if you want to decorate the cake with an inscription, as I did. The rest of the cream can be safely distributed over the cake layers, assembling the cake.
- When the cake is finished, you can decorate it to make pre-New Year's cooking easier. I advise you to make chocolate icing, everything is very simple - melt the dark chocolate, spread it on a piece of foil, place the foil with the chocolate side on the cake, smooth it so that the chocolate sets and put everything in the freezer for an hour.
- Carefully remove the foil from the cooled cake; if there are sloppy areas somewhere, don’t worry, these moments can be decorated with stars, which I suggested making from dough scraps.
- The final step will be to make an inscription from the cream, which I advised to leave in a pastry bag, and also serve the cake with a lit sparkler for atmosphere))
Well, just like that, if you have any questions, feel free to ask, I will help you. I’ll try very hard to prepare another recipe, but I can’t promise this, because I’ll be leaving Minsk before next Friday arrives)
I won’t say goodbye, I’ll definitely be back this year, so I’ll just wish you a good weekend, see you later!)
Already read: 3596 timesWhat holiday table is complete without cake? That's right, none! And on the New Year's table there should be not a simple cake, but a chocolate one. How to make New Year's chocolate cake, recipes for every taste, read on.
New Year's chocolate cake: recipes

Recipe for New Year's Eve Cake
Ingredients:
- 3 eggs
- 2 tbsp. flour
- 0.5 tbsp. Sahara
- a pinch of salt
- 0.5 tbsp. cocoa powder
- 2 tbsp. l. ground coffee
- 0.5 tbsp. sour cream
- 0.5 tsp. soda
- 1 tsp. lemon juice
For praline:
- 50 gr. Sahara
- 50 gr. crushed nuts
For impregnation:
- 1 cup of coffee
- 2 tbsp. l. cognac
For the glaze:
- 150 gr. dark chocolate
- 50 gr. butter
Cooking method:
- Separate the yolks from the whites.
- Beat the whites with a pinch of salt and the yolks with sugar.
- Quench the soda with lemon juice.
- Combine all ingredients for the dough.
- Knead the dough to a consistency similar to sour cream.
- Bake 1 cake from the dough, cool and cut crosswise into two thin cakes.
- Mix coffee with cognac, soak in the cake mixture.
- Melts for praline Place sugar in a dry frying pan, add crushed nuts, mix, then transfer to a mortar and grind into a homogeneous paste.
- Brush the cakes with praline and place on top of each other.
- For the glaze, melt the chocolate in a water bath, cool slightly and beat together with soft butter.
- Use a spatula to spread the frosting onto the cake. Decorate the cake to your liking.

Recipe: Chocolate cake with condensed milk
Ingredients:
- 4 eggs
- 3 tbsp. Sahara
- 2 tbsp. kefir
- 2 tsp. soda
- 1 tsp. vinegar
- a pinch of salt
- 3 Art. l. cocoa powder
- 3 tbsp. flour
For cream:
- 200 gr. butter
- 1 b. boiled condensed milk (can be chocolate or coffee)
Cooking method:
- Beat eggs with sugar and salt.
- In kefir pour slaked soda with vinegar.
- Combine all ingredients for the dough. extinguish with vinegar a spoonful of soda and add kefir to the whipped mass.
- Bake three cake layers from the dough in a springform pan.
- For the cream, beat soft butter with condensed milk.
- Grease the cooled cakes with cream and stack on top of each other.
- The cake can be decorated with almond petals, crushed nuts, grated chocolate, wafer crumbs, etc.

Swiss Chocolate Cake Recipe
Ingredients for the dough:
- 1 tbsp. flour
- 0.5 tsp. baking powder
- a pinch of salt
- 4 eggs
- a pinch of soda
- 1 tbsp. Sahara
- 100 gr. grated chocolate
- 1 tsp. vanilla sugar
- ¼ tbsp. cold water
For the glaze:
- 150 gr. milk chocolate
- 100 gr. butter
Cooking method:
- Sift flour, baking powder, baking soda and salt.
- Beat the eggs with sugar, then add the flour little by little.
- Melt the chocolate in a water bath with vanilla and water, pour into the dough.
- Bake three cakes. Cool.
- Melt milk chocolate for glaze in a water bath.
- Remove from heat and stir in butter into chocolate.
- Place the glaze on ice and beat until fluffy.
- Brush the cakes with icing and place on top of each other.
- Decorate the cake to your taste.

Chocolate Cake Recipe with apricot jam
Ingredients:
- 5 eggs
- 200 gr. flour
- 100 ml cream
- 50 gr. cookie
- 200 gr. chocolate
- 200 gr. butter
- 10 tbsp. l. apricot jam
Cooking method:
- Reserve half the chocolate and butter for the frosting.
- Using the remaining ingredients, except jam, knead the dough.
- Grease a springform pie pan and sprinkle with cookie crumbs.
- Divide the dough into two parts.
- Distribute one part of the dough into the mold.
- Spread with jam and cover with the second part of the dough. Prick the dough with a stick and put it in the oven.
- Bake the cake for about 20 minutes at 180 degrees.
- Cool the finished pie in the pan, then transfer to a plate.
- Prepare glaze from the remaining chocolate and butter as indicated in the recipes above.
- Cover the cake with glaze and sprinkle with cookie crumbs.

Recipe: Chocolate cheesecake
Ingredients:
- 1 tbsp. flour
- 1 egg
- 5 tbsp. l. cocoa powder
- 0.5 tsp. soda
- 1 tsp. vinegar
- 0.5 tbsp. Sahara
For cream:
- 200 gr. paste-like cottage cheese
- 50 gr. grated chocolate
- vanillin
- powdered sugar to taste
Cooking method:
- Beat the egg with sugar.
- Quench soda with vinegar.
- Sift flour and cocoa into a bowl.
- Add beaten eggs and slaked soda into the flour.
- Prepare the batter.
- Bake the dough into a crust, cool and cut into two.
- For the cream, grind the cottage cheese with chocolate, powdered sugar and vanilla.
- Grease the cooled cakes with curd cream.
Video recipe for cake " Chocolate log"
Have fun cooking and be healthy!
Always yours Alena Tereshina.
Hello my friends!
In 20 days - January 1st. I thought and thought about how you and I could make an already difficult life easier, and don’t run all over the site looking for the right cake or dessert for the New Year. I decided to make a selection here “New Year’s Cake 2018” - with all my cakes and desserts that deserve to take pride of place on your New Year’s table, with links and pictures, so that when you look at the picture and read the short description, you immediately understand whether you should go for the recipe or not.
Closer to the new year, of course, I will be adding fresh New Year’s recipes, but for now we will choose from what has been acquired through back-breaking labor and has been tested many times.
For lovers of cream cakes
I make this particular cake very often. Simply because everyone likes him. Except for my little nephew, who doesn't like strawberries.
What’s good about this cake is that, if you don’t have time, you can replace the sponge cake with ready-made savoiardi cookies. Well, and strawberries, or any other berry or fruit)) Moreover, they can be used frozen here.
The cake with mascarpone turns out very tender and light. Just right after a rich New Year's feast.
This is one of the most popular cakes on my site. In my recipe it goes with cherries, but in its cherry interpretation it has no equal. The look is completed with the most delicate chocolate cakes and, again, my favorite mascarpone cream.

If you are planning to celebrate the New Year with true chocolate connoisseurs, then prepare this cake. It contains almost a kilogram (!) of dark chocolate.

A spectacular two-color cake with a bright red filling will come in handy for the New Year's holiday.

But the taste of this cake exceeded all my wildest expectations. There’s nothing even to describe here: complete harmony and mutual understanding.
This cake cooks faster than the classic Snickers meringue cake, but it turns out very tasty.

The composition of my Snickers is as follows:
- chocolate biscuit;
— cognac impregnation;
- boiled condensed milk cream;
- salted peanuts;
- caramel;
- chocolate glaze.
The recipe for this masterpiece belongs to one of the co-authors of my site, Instagram blogger Olga Vilchevskaya. I cook it traditionally with cheese cream. But with sour cream, I’m sure it’s no less gorgeous.

For fans of mousse cakes
An absolutely simple, but very impressive New Year's cake with two types of mousse, separated by a bright juicy coolie and hidden in a thin biscuit coat.

I advise you to start preparing this cake a couple of days before the celebration and divide it into several stages.
A cake for those who try to stick to a diet even during the holidays, based on a light mousse with yogurt and white chocolate and peaches.

In this article I describe many techniques for making mousse cakes: sponge cakes, mousses, jelly layers, etc.

I used a cake with coconut mousse, almond sponge cake and berry compote as the basis.
And this cake is one of my favorites. Tenderness itself. Both in texture and taste.

It combines two iconic desserts that have divided the whole world into two camps: cheesecake and tiramisu. So, if you can't decide which is better, make this cake. Supporters of both one and the other will be satisfied.
If you are not a big coffee lover, then take moccacino, it has a more delicate taste. Personally, I, not a coffee lover, like it better this way.
For lovers of the classics
One of the simplest cakes you can make for New Year.

For classic Pancho, the most ordinary chocolate sponge cake, simple cream made from sour cream, condensed milk and vanilla, canned pineapples and peaches, walnuts and chocolate glaze are used. Although I highly recommend using canned cherries.
Who, if not him, deserves a place of honor at the New Year's feast.
I don't think he needs any special introduction.

Agree, the New Year is a great occasion to prepare everyone’s adored good old Kiev cake. You are unlikely to find anyone indifferent to him.

For those who have forgotten, I’ll remind you: crispy nut cakes, chocolate butter custard - that’s, in fact, all that this masterpiece dessert is rich and joyful with.
I adored this cake, like all Soviet cakes. It's really worth remembering.

In our family, boiled condensed milk is held in special esteem, so my honey cake is made with it.

Many connoisseurs say that this is the best Napoleon they have ever tried. That's all you need to know about him.

And some foreign classics.
The peculiarity of this dessert is that it must be assembled immediately before serving, since the meringue gets soggy very quickly from moisture.

With cherry or caramel topping - divine.

A recipe for real tiramisu with mascarpone cheese and following all the procedures that I witnessed in Italy in the process of preparing tiramisu with ordinary Italian Ragazza.

For the busiest - no-bake desserts
The recipe is designed for a mold with a diameter of 20 cm. Therefore, if there are more than two of you, feel free to double the proportions.

This is not just a very simple and quick cake, it is also a very light cake, which is also better to increase if you are cooking for a large company.

Typically, Italian panna cotta is made from cream or a mixture of cream and milk, and resembles milk jelly. Panna cotta is often served with fruit, caramel or chocolate sauce.

I remember that as a child, after a generous New Year’s feast, there was always no room left for dessert. And only cool, weightless jelly saved us in such difficult moments. For some reason there was always enough room for him.

Well, I think everyone will find something necessary and useful here for themselves.
I wish you a pleasant pre-holiday bustle! And I don't say goodbye until next year. See you again in this.
Good luck, love and patience.


